Black is the only color Halloween truly belongs to, and on your nails it does all the heavy lifting. A glossy onyx set needs nothing else to feel spooky, but black is also the perfect canvas for a web, a bat, or a crimson drip when you want to lean in.
These black Halloween looks run from a sleek all-black manicure to full gothic glam, with the technique behind each, what it costs, and how to wear black so it stays chic and modern.
Black Halloween Nails at a Glance
- An all-black set, glossy or matte, is spooky enough on its own.
- Black is the best base for art: webs, bats, drips, and stars all pop on it.
- Gel holds black art best for the season; a glossy topcoat keeps it from looking flat.
Glossy Inky Midnight

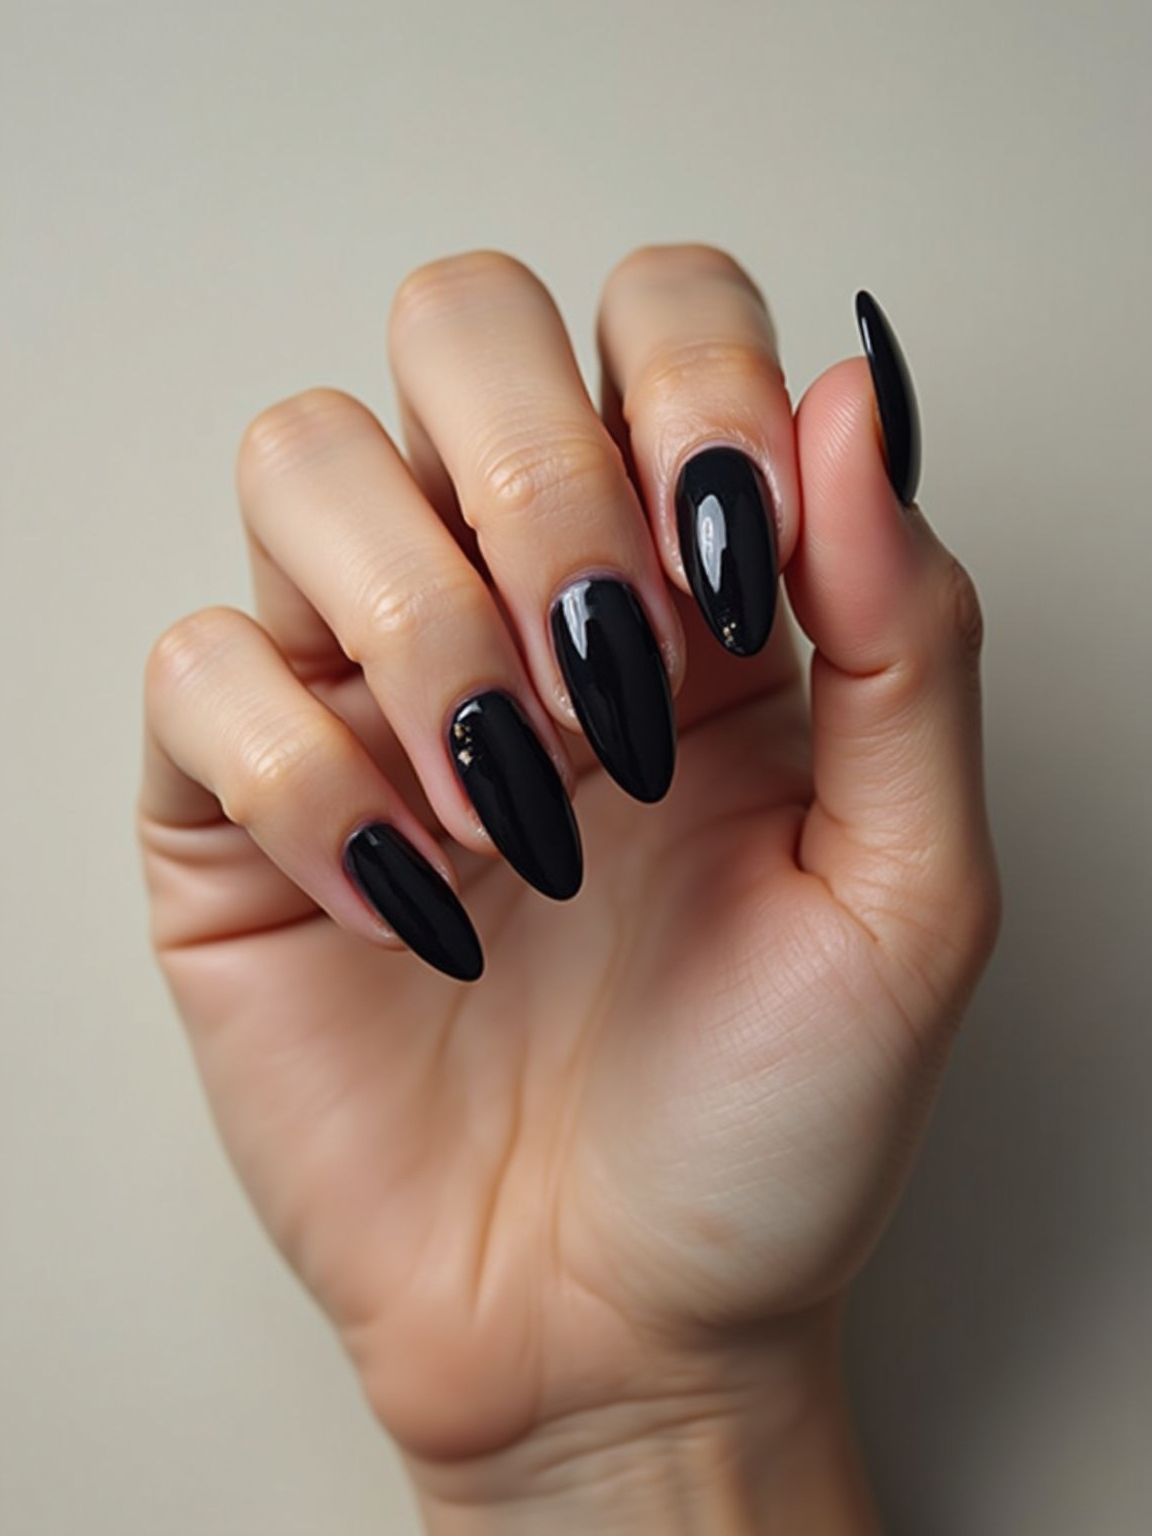
The simplest black Halloween nail is also the most timeless: a glossy inky black on every nail, buffed to a mirror shine. It needs no art to feel spooky, just depth and gloss, the easy choice when you want chic over costume.
Why Shine Matters on Black
The whole look lives in the shine. A flat black falls dull, so a high-gloss topcoat is what turns it into liquid onyx that catches the candlelight. This is the one I steer clients toward when they want spooky that still works at the office.
It suits every nail shape and skin tone, looking especially sharp on a longer almond or coffin. Keep the application even, since solid black shows every streak. A gel set runs about $35 to $50.
Matte Noir With Smoky Tips

Matte black takes the drama somewhere moodier, trading shine for a soft, suede-like finish that feels witchy and modern. Adding a slightly glossy smoked tip gives a subtle play of textures that keeps it from looking flat.
The matte finish is what makes it feel distinctly Halloween, dark and a little mysterious. It pairs beautifully with all-black outfits and comes across truly sophisticated.
Keep a matte topcoat handy to re-seal it, since the flat finish fades sooner than a glossy one. On deep skin a true matte black looks especially rich and velvety against the complexion.
🅰️Glossy black
Liquid, reflective, and chic; catches candlelight and reads expensive, but shows streaks.
🅱️Matte black
Moody and witchy with a suede finish; modern and dramatic, but dulls and needs re-sealing.
Mirror-Shine Black Coffin

On a long coffin shape, a mirror-shine black is pure gothic glam, all sharp lines and reflective depth. The tapered, flat-tipped shape plus glossy black turns dramatic and high-fashion, the kind of set that makes a whole costume unnecessary.
The length is the statement here, so it suits anyone who loves a bold nail. The glossy finish keeps the coffin from looking heavy, bouncing light along the long shape.
It’s a commitment in upkeep, since coffin extensions need fills, but the payoff is a striking, vampy look that carries from Halloween into the holidays. Keep the shine fresh with a topcoat refresh.
Fine Spiderwebs on Black

Spiderwebs are the classic Halloween motif, and on a black base they look elegant when kept fine. Thin silver or white web lines drawn over glossy black look delicate and a little eerie, the perfect amount of spooky.
- Draw fine web lines with a thin striping brush over a black base.
- Limit webs to an accent finger or two for an elegant touch.
- Silver lines feel modern; white feels classic.
A perfect all-black set in three steps.
1Base
Apply two thin even coats of black so there are no streaks.
2Art
Add one motif or accent if you want, on just a nail or two.
3Seal
Finish with a glossy or matte topcoat and cap the free edge.
Velvet Black Negative-Space Moons

A reverse-moon design leaves a bare crescent at the base while the rest stays black, a modern, architectural take on the Halloween nail. This negative space keeps it minimal, and the look stays clean for weeks as it grows.
In a velvet matte black, the half-moon looks chic and a little gothic at once. It’s the design-lover’s spooky nail. All clean shapes, no literal motifs.
- Leave a clean bare crescent at the base of each nail.
- A velvet matte black makes the negative space pop.
- The bare crescent disguises new growth, so it stretches between fills.
Matte Noir Bats

Tiny bat silhouettes are the cutest minimal Halloween motif, and on black they look chic rather than childish. A few small black bats over a matte or sheer base look subtly seasonal, especially when kept tiny.
The smaller and simpler the bats, the more elegant the look. Place just a couple per nail for a quiet nod to the season.
- Paint small bat silhouettes with a fine detail brush.
- Keep them tiny and to a couple of accent nails.
- Works over a sheer, nude, or matte black base.
Heads-Up
Black polish stains skin and cuticles if it floods the sidewalls. Keep the application tidy, swipe cuticle oil around the nail first as a barrier, and clean any skin spills with a brush before you cure or dry.
Glittery Black Ombré

Fading black into glittery sparkle gives Halloween a party-ready twist. A black base melting into a dense black or silver glitter at the tips looks like a starry night and turns a simple black set into something celebratory for a Halloween party.
- Sponge glitter at the tips and fade it up into the black.
- Black or silver glitter reads spooky; gold warms it up.
- A glossy topcoat smooths the glitter so it isn’t gritty.
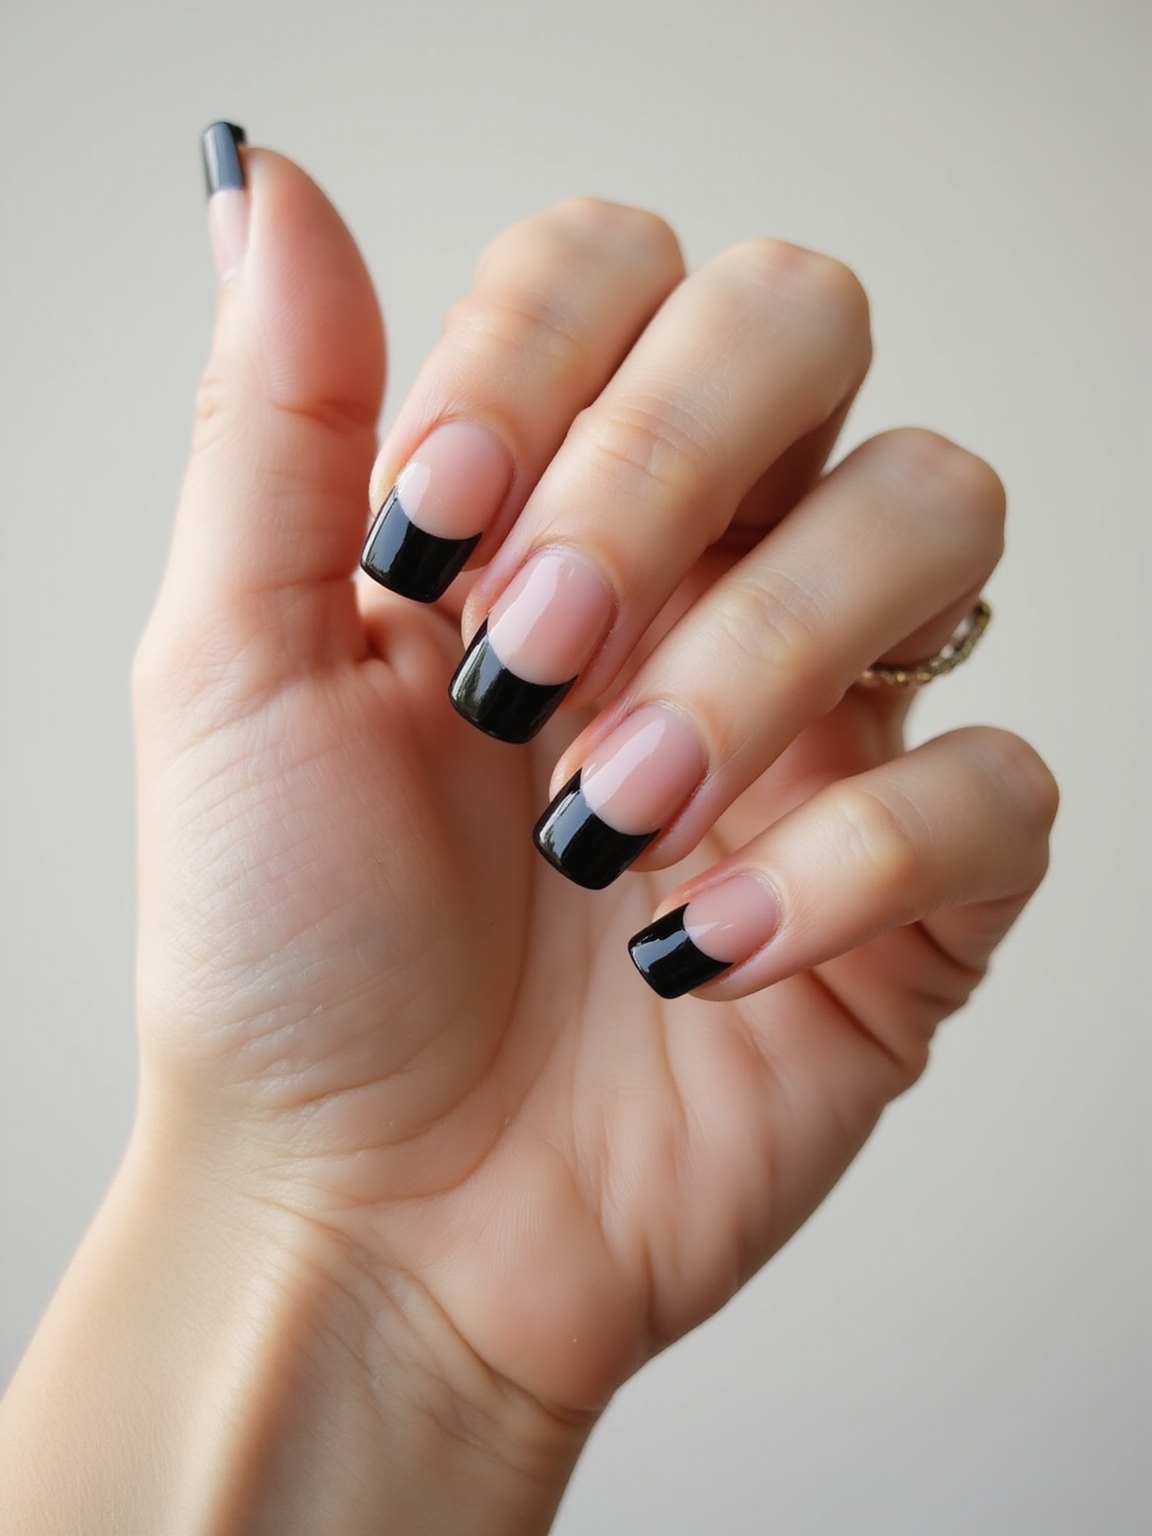
Matte Black Goth French Tips
A black French tip is the gothic update to a classic, swapping white for inky black at the edge. In a matte finish it feels moody and modern, keeping the clean French structure while flipping the whole mood dark.
Goth French, Office Edition
It’s the most wearable black Halloween look, subtle enough to keep past October but unmistakably edgy. The thin black tip flatters every nail length and elongates short nails.
Keep the line crisp against a sheer or nude base so the contrast lands. This is the goth manicure you can wear to work without anyone blinking.
💡Keep It Chic
When in doubt, go glossy and minimal. One small motif on a glossy black set looks pricier than a full hand of busy Halloween art. Let the black carry the drama.
Glossy Crimson Drips on Onyx
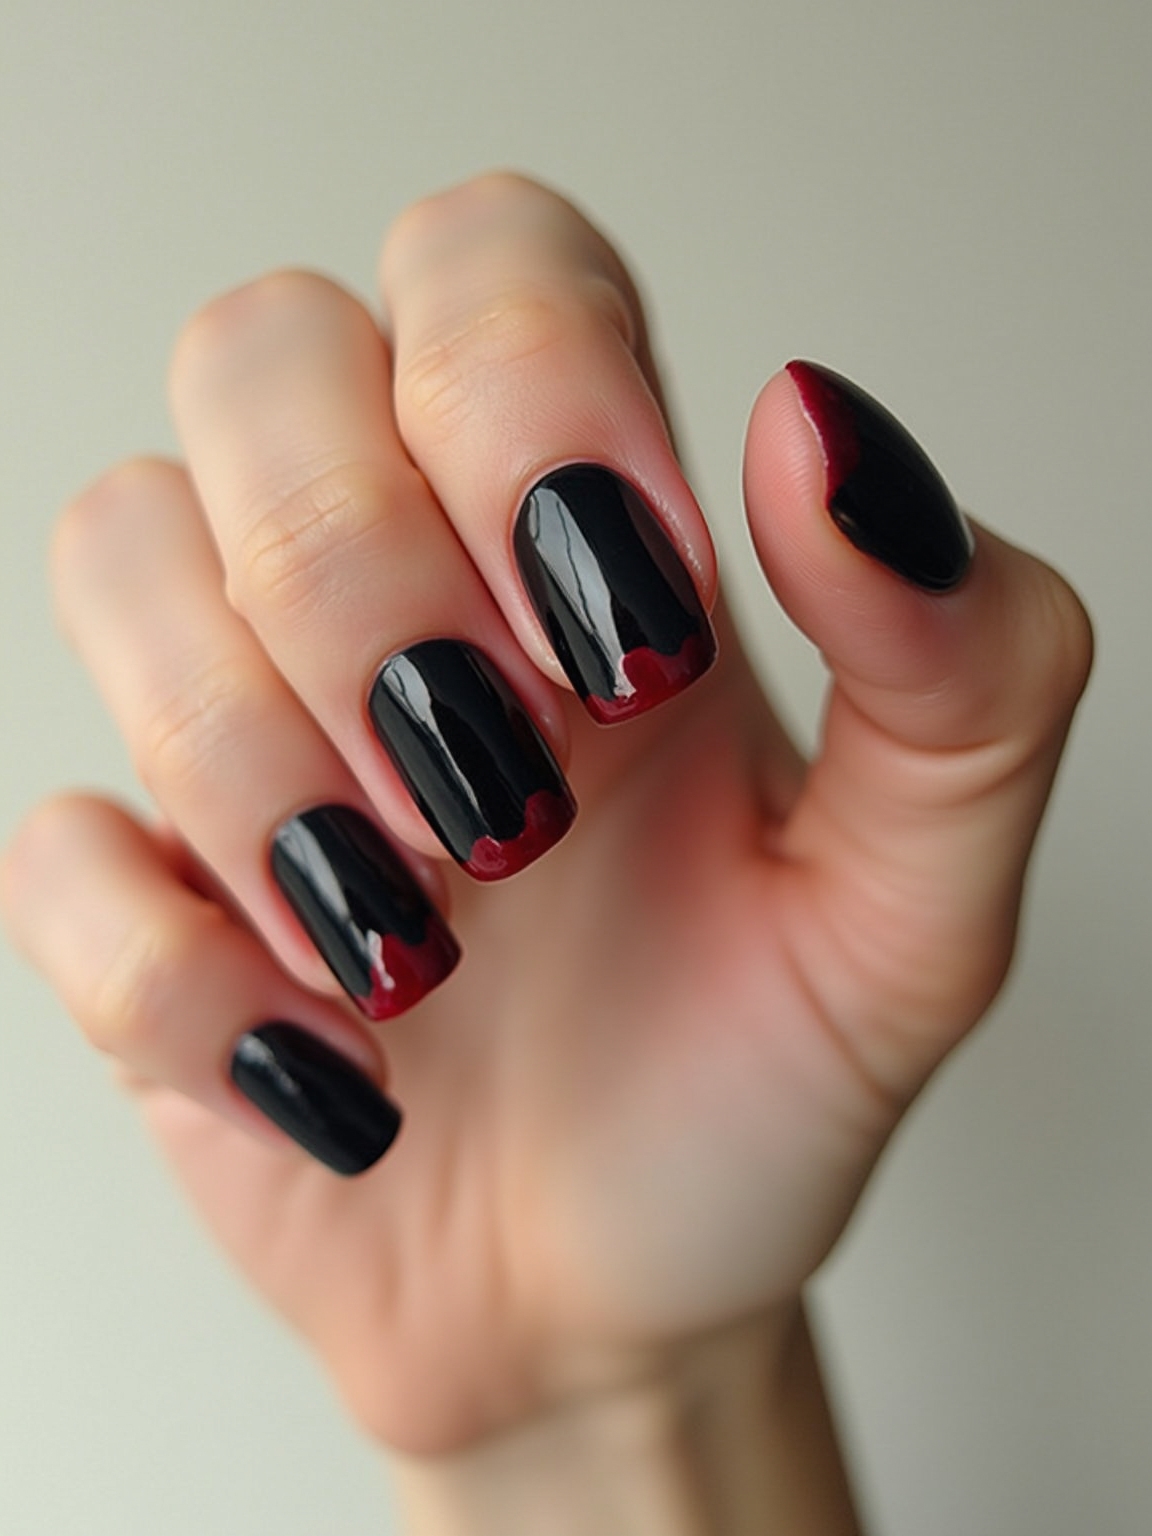
For full spooky drama, glossy crimson drips down a black base look like a scene from a horror film, in the best way. Deep red dripping from the cuticle over inky black is theatrical and bold, the look for someone who wants their nails to commit to Halloween.
Done in a rich, glossy crimson rather than a bright primary red, it stays sophisticated. The drips should be uneven and organic so they look real, then sealed glossy so they look wet.
- Paint uneven crimson drips from the cuticle over black.
- Use a deep, glossy red so it reads elegant, not cartoonish.
- Crimson on black flatters every skin tone, glowing on deep skin.
Micro-Stud Negative-Space Accents

For edge without literal motifs, a few tiny metal studs over black is minimalist Halloween glam. A scatter of micro studs near the cuticle of a black nail adds a hardware, rock-and-roll feel that lands spooky-chic rather than cute.
- Place a few small silver or black studs over a black base.
- Wear studs on just an accent finger or two for a modern edge.
- Seal the edges with topcoat so the studs stay put.
Smoky Swirls With Chrome Veins

Marbled smoky swirls threaded with thin chrome veins look like cracked stone or dark marble, eerie and luxe at once. The metallic veins catch light across the black, giving a gothic, gemstone effect that feels expensive.
- Swirl grey and black together, then add fine chrome veins.
- Keep the veins thin and irregular like real marble.
- Seal with a no-wipe top so the chrome holds its shine.
Stiletto Black With Chain Charms

The most maximal look here, a pointed stiletto in glossy black hung with tiny chain charms, is pure rock-and-roll Halloween. The sharp shape plus metal hardware looks fierce and a little dangerous, the set for someone who wants maximum drama.
- Best on long stiletto or coffin extensions for the drama.
- Attach small chain charms with gel glue at the tip or cuticle.
- Save it for the night itself; charms catch on everything.
Matte Base, Glossy Accents

Playing matte against glossy on an all-black set is the most subtle, sophisticated Halloween nail. A matte black base with a glossy black motif, a bat, a web, a spider, drawn in shiny topcoat catches the light only where the design is.
Tone-on-Tone Art
The tone-on-tone effect means the art only shows as the light hits it, which comes across incredibly chic and modern. It’s spooky for people who hate anything obvious.
Use a matte topcoat over the whole nail, then a glossy topcoat to paint the motif. The finish contrast is the entire design, so no color is needed at all.
Silver Stars and Crescent Moon

Celestial nails bring a softer, witchy magic to black Halloween: tiny silver stars and a crescent moon scattered over an inky base. It’s mystical rather than scary, perfect for anyone who loves the witchy side of the season over the gory one.
The silver against black looks like a night sky, and it carries well past Halloween into winter. Keep the stars small and the moon delicate so it reads elegant.
- Dot tiny silver stars and a thin crescent over glossy black.
- Use foil or chrome for the silver so it catches light.
- Mystical and wearable well beyond October.
Styling Tips for Black Halloween Nails
A few choices make black Halloween nails look chic rather than costume. First, gloss is your friend: a flat black falls dull fast, so a high-shine topcoat is what keeps an all-black set looking liquid and rich. For matte looks, re-seal with a matte topcoat as it dulls. A gel black set runs about $35 to $55, with art add-ons from $5 to $20, and simple accent art adds only ten to fifteen minutes to your appointment while the set holds two to three weeks.
Second, pick one statement element. Black is so striking on its own that you rarely need more than one motif, so a web, a drip, or a few studs on accent nails beats covering every nail in art. Clients ask me for these every October, and I tell them the chicest black Halloween nails just whisper the season, since the black already does the talking. And keep cuticle oil handy, because dark polish makes any overgrown or dry cuticle far more obvious.
Black Halloween Nail Questions
?What are the chicest black Halloween nails?
A glossy all-black set, a matte black with one tiny glossy motif, or a black French tip. They read sophisticated and spooky at once, and the minimal-art versions can even be worn past Halloween into the colder months.
?How do I keep black polish from looking flat?
Shine is the answer. A flat finish dulls fast, so a high-gloss topcoat is essential, and a smooth, even base coat keeps it from streaking. For matte looks, use a quality matte topcoat and re-seal it as it dulls through the week.
?Which black Halloween nails are easiest at home?
A solid glossy black, a black French tip, and tiny bats or stars over black are all beginner-friendly with a steady hand. Webs and drips take more patience, while chrome veins and coffin extensions are better booked at the salon.
?Do black Halloween nails suit deep skin tones?
Beautifully. A glossy or matte black looks rich and striking on deep skin, and accents like crimson drips, silver stars, and chrome veins glow against the complexion. Black is one of the most universally flattering nail colors there is.
Let Black Do the Talking
Black is the most powerful color in your Halloween arsenal, spooky on its own and the perfect backdrop for a web, a drip, or a scatter of stars. Whether you keep it a sleek glossy onyx or load a stiletto with chains, the black base is what makes the whole look land. Pick the one that matches how far you want to take the season, and let that inky base do the talking.