Brown nails get written off as the safe, sensible choice, the manicure you pick when you cannot decide on anything else. I want to push back on that, because brown is quietly the most wearable and most flattering color in the polish drawer. It goes with every outfit, it suits every skin tone, and it spans everything from a milky latte to a near-black espresso.
These eight brown nail styles are the ones worth saving, the looks you will scroll back to before your next appointment. Some are barely-there and minimal, some are full nail-art, and all of them prove that brown is anything but boring. Here is where to start.
Brown Nails, Quick Answers
Do brown nails suit every skin tone? Yes. Warm browns like caramel and mocha flatter golden and deep skin, while cooler taupe-browns suit fair and cool tones. There is a brown for everyone, and a sheer formula adapts to your skin.
Are brown nails low-maintenance? Very. Deeper browns hide regrowth and chips far better than brights or pastels, so they look fresh longer between appointments, which makes them a smart pick for busy weeks.
Glossy or matte brown? Glossy reads rich and polished, matte reads modern and velvety. The same brown shade gives two completely different looks depending on the top coat you choose.
Milky Mocha Latte Nails

Milky mocha is the cozy, coffee-with-cream version of a neutral nail, a soft tan-brown with a slightly sheer, milky finish. It is the brown to ask for when you want something clean and polished that still feels warm. Because the formula is semi-sheer, a hint of the natural nail glows underneath, which keeps the color soft and light on the hand.
It flatters just about everyone. On deeper skin it warms into a rich latte, and on fair skin it lays down the softest milk-coffee glow. This is the manicure I reach for when a client wants neutral but not bland, the kind of shade that quietly lifts a whole outfit.
- Ask for a sheer, milky tan rather than a fully opaque brown
- Best on short to medium nails, where it looks clean and modern
- Pairs with everything, see milky nails for the wider trend
Mirror-Gloss Espresso Gel

If milky mocha is the soft option, mirror-gloss espresso is the drama. This is the deepest brown before black, finished with a high-shine gel top coat that looks wet and glassy. The depth makes hands look elegant and pulled-together, and the shine catches light with every movement.
Why espresso beats true black
Espresso is the most low-maintenance dark shade because the brown undertone is softer and warmer than a true black, so it stays elegant instead of severe. It also hides chips and grow-out well, which is part of why it wears so beautifully over a couple of weeks. I steer a lot of clients here when they want drama that still looks grown-up.
Gel is the move here, since the mirror finish keeps its glassy shine far longer than regular polish, often the full two to three weeks between fills. A gel set takes about forty-five minutes in the salon. If you do it in regular lacquer at home, add a fresh top coat every couple of days to keep that wet-look gloss alive.
Heads-Up
Sheer browns show every ridge and stain on the natural nail, so buff lightly and use a smoothing base coat first. If your nails stain easily, a clear barrier base also stops deep chocolate shades from leaving a tint behind when you take them off.
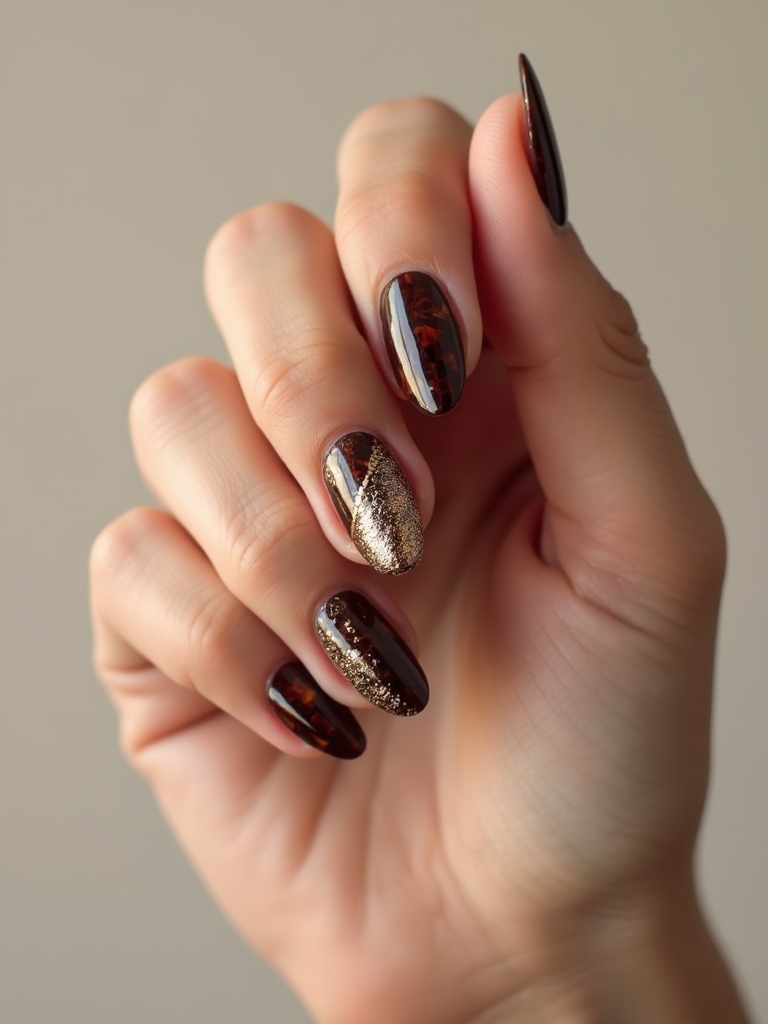
Caramel Tortoiseshell Tips
Tortoiseshell nails borrow the warm, mottled pattern of tortoise-shell glasses, all amber, caramel, and deep brown swirled into a translucent, glassy finish. Kept to the tips alone, it feels fresh and modern instead of busy, and the golden warmth glows against every skin tone.
It is one of those manicures that looks far more involved than it actually is, and it photographs beautifully in warm light. I love sending a client home with this one before a fall trip. Here is the way to build it:
- Start with a sheer caramel base so the pattern stays translucent
- Dot deeper brown and amber at the tips and gently blur the edges
- Seal with a glossy top coat to give it that amber, glass-like depth
A Sheer Cocoa Edge

For the most minimal brown here, a sheer cocoa edge keeps the nail almost bare and washes just a hint of warm brown toward the tips. It is barely there, but it adds the softest definition and a quiet, expensive finish.
This is the brown for people who swear they do not like nail color, the ones who want groomed, put-together hands while keeping the whole thing low-key and undetectable. It is also forgiving to apply, since the sheer wash hides small mistakes:
- Use a sheer, your-nails-but-better base in a warm nude
- Wash a touch of cocoa toward the free edge and blend it in
- Keep nails short and neat, see nude nails for more of this vibe
🅰️Glossy brown
Rich, wet-look, and polished. Best for deep espresso and chocolate shades where shine shows off the depth.
🅱️Matte brown
Soft, velvety, and modern. Turns the same shade suede-like and understated, great for mocha and taupe.
Geometric Mocha Negative Space

Negative-space nails leave parts of the natural nail bare and use polish to draw clean, graphic shapes. In a warm mocha brown, the effect is modern and architectural without being loud. The bare areas keep it light, and the crisp brown lines keep it intentional.
Why negative space grows out so well
This is a great way to wear brown if a full opaque manicure feels like too much. A single diagonal line, a half-moon, or a thin outline gives you that designed, editorial look with minimal color on the nail.
It also grows out gracefully, because the bare areas mean there is no hard regrowth line creeping in at the cuticle. For anyone trying to stretch a few extra weeks out of a manicure, that forgiveness is a real bonus, and it keeps the nails looking deliberate even at week three.
A Latte-to-Cocoa Gradient

A gradient set runs from a pale latte on one nail through to a deep cocoa on the next, so the whole hand reads like a coffee menu. It is a playful way to wear several browns at once, and it lets you avoid committing to a single shade. You get light, medium, and deep all in one manicure.
The same gradient looks completely different depending on the finish. Glossy gives it a rich, candy-like depth, while a matte top coat turns it soft and velvety, like suede. Either way, the run of warm browns is soothing to look at and flatters the skin on your hands.
It is also a clever pick if you can never decide on a single shade, since you get to wear the whole coffee menu at once. Arrange the nails light to deep across the hand, or mirror them out from the middle finger for a more symmetrical effect. For a softer neutral version, see neutral nails.
A quick at-home tortoiseshell tip:
1Sheer base
Paint a translucent caramel over a glossy base coat and let it set.
2Dot and blur
Add small dots of deep brown and amber at the tips, then dab with a clean brush to soften.
3Seal
Finish with a high-gloss top coat for that glassy, amber depth.
Caramel-Chocolate Checkerboard

Checkerboard nails had a big moment, and the warm-brown version is the most wearable take on the trend. Swapping the usual black-and-white for caramel and chocolate softens the graphic check into something cozy and retro, the kind of detail that feels playful without trying too hard.
The look stays balanced when you save the check for an accent finger or two and keep the rest in a solid brown. That two-tone caramel-and-chocolate palette is what keeps it cute rather than costumey, and it is a fun way to dip into nail art if you usually stick to solids.
- Keep the check to one or two nails and solid brown on the rest
- Use a striping brush or tape for crisp, even squares
- Finish glossy so the caramel and chocolate both look rich
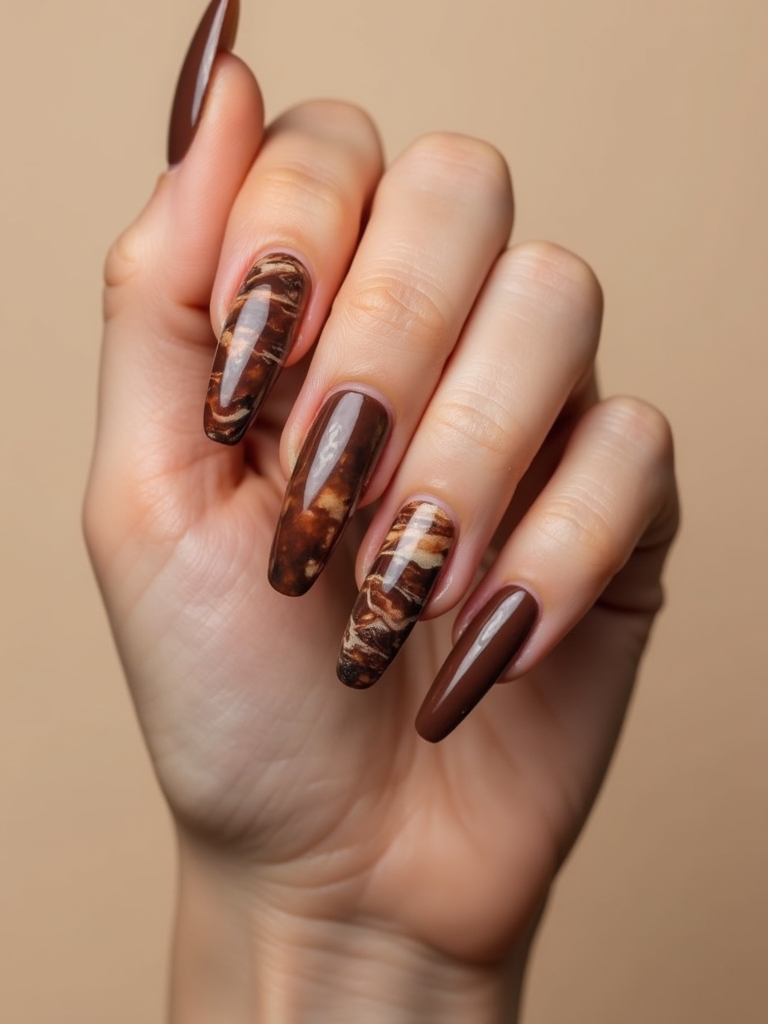
Glossy Chocolate Marble

Marble nails swirl two or more browns into a soft, stone-like pattern, and in glossy chocolate tones the effect looks rich and a little luxe. Every nail turns out slightly different, and that one-of-a-kind quality is half the appeal, while the swirls quietly disguise any imperfection as the nail grows.
It reads expensive but takes only a dotting tool and a steady hand, which makes it a forgiving, beginner-friendly nail-art look to try at home. A glossy top coat is what melts the swirls together into that smooth, stone-like depth. Here is the simple version:
- Paint a milky brown base and let it set
- Swirl a deeper chocolate through it with a thin brush or a dotting tool
- Top with high-gloss for that polished, marbled stone finish, see marble nails
Common Mistakes to Avoid
The most common brown-nail mistake is reaching for a shade that fights your undertone. A cool, gray-leaning taupe can look washed out on warm or deep skin, while a very orange-brown can clash on cool tones. The fix is easy: match the warmth of the brown to your skin, and when in doubt, a sheer formula bends to flatter almost anyone. Swatch the polish on your own fingers before you commit, since brown shifts a lot from the bottle to the nail.
The other mistake is skipping the top coat. Brown, especially a deep glossy one, lives or dies on its shine, and a good top coat is what keeps it looking wet and rich instead of dull and dragged. Add a fresh layer every three or four days to stretch the life of the manicure.
A salon gel set runs about $40 to $60 and keeps its gloss for a solid two or three weeks, while a bottle of regular polish costs a few dollars and just needs that top-coat refresh. Treat the finish as the whole point, and your browns will keep looking expensive. For an autumnal spin on these shades, see fall nails.
The Brown You’ll Reach For Again
Brown nails earn their reputation as a wardrobe staple, but as these eight looks show, staple does not mean dull. From a barely-there cocoa edge to a glossy chocolate marble, brown stretches across minimal and bold, glossy and matte, soft and deep, with a version for every mood and every skin tone.
So which one are you saving for your next appointment, the milky latte, the mirror espresso, or the playful checkerboard? Whatever you choose, brown is the manicure you will keep coming back to, season after season.