

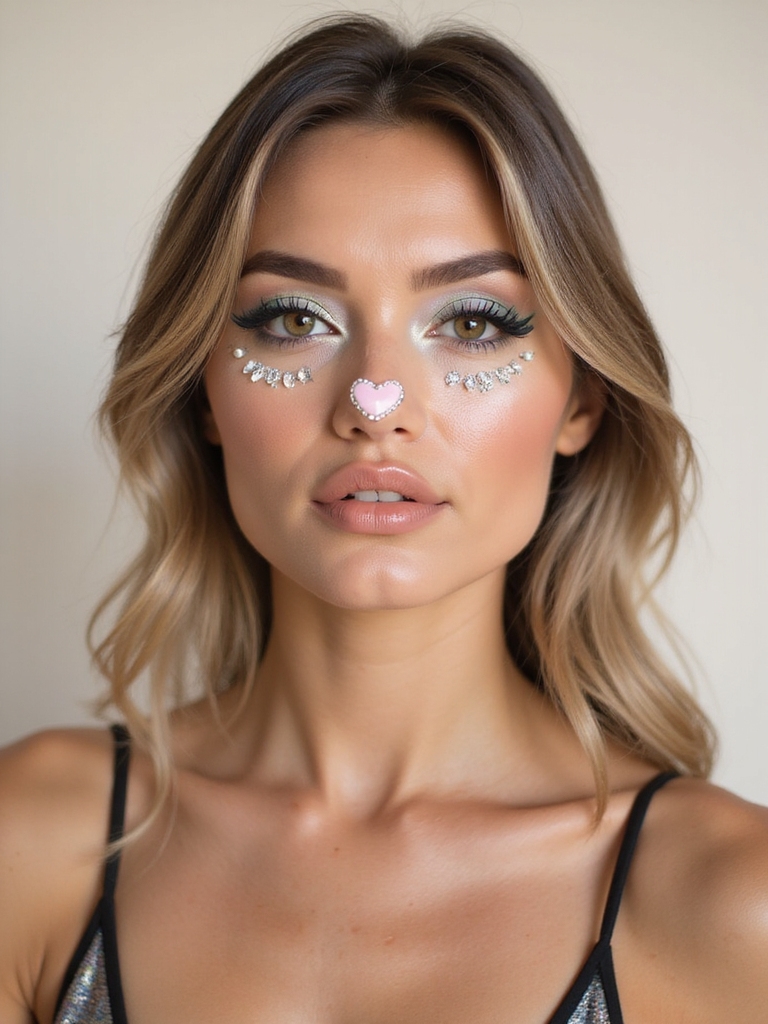
Bunny makeup is the rare costume look that takes ten minutes, uses products you already own, and looks adorable in every photo, which is exactly why it shows up at Halloween, Easter brunches, festivals, and cosplay meetups alike. The whole thing rests on three small signals: a flushed nose, a few whiskers, and soft, wide-eyed glow.
The catch is that bunny makeup is also the easiest look to overdo, tipping from sweet into clown territory with one heavy hand. Below are fifteen versions, from a barely-there pink nose to full holographic glam, each with the real steps, the shades that actually work on your skin tone, and how to keep it from sliding off by mid-party.
The Bunny Look at a Glance
| Signature element | How to do it | Keep in mind |
|---|---|---|
| Rosy nose | Tap cream blush onto the tip and blend the edges soft | Build slowly; one extra layer is what turns it cartoonish |
| Whiskers | Light flicks with a fine liner from beside the nose | Keep them thin and few, three or four a side |
| Wide-eyed glow | White inner corners and fluttery lashes | This is what makes it cute rather than scary |
Pastel Lavender Bunny Glam

If you want bunny that leans more fashion than costume, a wash of pastel lavender across the lid is the prettiest place to start. The cool lilac keeps the whole face soft and dreamy while still leaving room for the signature pink nose to pop. It photographs like a daydream.
Best for a soft, wearable take
Sweep a matte lavender shadow over the mobile lid and blend it up just past the crease, then keep everything else minimal: a pink nose, a little gloss, and skin left dewy. The point is one gentle color story, kept deliberately simple.
This version flatters people who feel shy about full costume makeup, since it photographs as a pretty spring look first and a bunny second. Wear it to an Easter brunch and you’ll fit right in without feeling in costume.
Dewy Glass Skin With a Rosy Nose

The dewy, glass-skin bunny is all about a base that looks lit from within, which makes the rosy nose sitting on top feel fresh and bright. Skip heavy powder here; the glow is the whole point.
Glow first, color second
Prep with a hydrating moisturizer, use a thin layer of a luminous foundation or skin tint, and set only the under-eyes so the rest stays glossy. For the flush, I reach for a sheer pink cream and tap it onto the nose and the very tops of the cheeks, for that just-came-in-from-the-cold look.
On deeper skin tones, a sheer berry or warm raspberry cream reads as a much truer flush than a pale baby pink, which can go ashy. Clients with deeper skin always ask me which pink actually shows up, and the honest answer is to reach past the pastels for a berry that blooms like a real blush on you, so the nose looks fresh and natural.
The five-minute bunny base, in order:
1Set a glowy base
Light foundation or skin tint, set only the under-eyes so the skin stays dewy.
2Flush the nose
Tap cream blush onto the tip and the tops of the cheeks, building slowly.
3Add the details
A few fine whiskers, white inner corners, and a coat of mascara.
Sparkling Lids and Fluttery Lashes

Sparkle on the lid and full, fluttery lashes do the heavy lifting of making bunny makeup look wide-eyed and sweet. A bunny is all about that innocent, doll-like gaze, and the eyes are where you build it.
Press a fine glitter or a shimmer topper onto the middle of the lid using a flat brush so it catches the light, then add a few clustered lash pieces to the outer corners for that flutter. Keep the liner soft and brown; a sharp black wing would harden the gentle look you’re going for.
The Soft Pink Heart Nose

Shaping the nose color into a little heart is the cutest small upgrade in the whole bunny playbook. It’s the detail that makes people smile when they notice it up close.
A playful twist on the classic nose
Use a small brush and a pink cream or a soft pencil to draw a tiny heart on the tip of your nose, then gently blend just the outer edges so it sits flush against the skin. A cotton swab cleans up any wobble before you set it.
Keep the heart small, roughly the size of the very tip of your nose. Drawn too big it loses the delicate charm. The faces I’ve painted always look cuter when this detail stays restrained, so use a light hand with a pink cream or soft pencil.
“Draw your whiskers last, after everything is set. If you lay them down early, blending blush or powder over the area smudges them into gray smears every time.”
Delicate Whisker Flicks

Whiskers are what tip a pink nose fully into bunny territory, but they’re also where most people overdo it. Restraint is everything here: a few fine, slightly curved flicks per side look far more charming than a thick row of heavy lines.
Use a fine liner brush or a sharp liquid liner and draw three or four thin whiskers fanning out from beside the nose, varying their length a little so they look natural. A couple of tiny dots above them, where whiskers root, adds a sweet finishing touch that most people forget.
Pearled Whimsical Bunny Look

Adding face pearls or tiny gems takes bunny makeup into fantasy and festival territory, which is where it gets really fun. The pearls catch the light and give the look a polished, editorial finish that photographs beautifully.
Less is still more here. A scattering of pearls in a deliberate path does far more than a face crowded with them.
- Place small pearls along the tops of the cheekbones following the curve up toward the temple.
- Use lash glue or a dab of skin-safe adhesive, pressing each pearl and holding for a few seconds.
- Cluster a few near the inner corners of the eyes to brighten and widen the gaze.
🅰️Round pink nose
The classic, fastest, and most natural-looking; great for daytime and shy first-timers.
🅱️Little heart nose
A touch more effort and more obviously ‘done’; perfect for photos and costume contests.
Monochrome Pink Bloom

A monochrome pink look, where the same soft rose runs across lids, cheeks, nose, and lips, is the most modern way to wear bunny makeup. It feels intentional, pulled-together, and modern, and it takes barely any product.
- Choose one cream blush in a flattering pink and use it everywhere for a cohesive wash.
- Layer a sheer pink shadow over the lids and a matching gloss on the lips.
- Keep the nose just a touch deeper than the cheeks so it still reads as the bunny detail.
Mauve Plum Smoldering Eye

For an evening or a grown-up party, a smoky mauve-plum eye gives bunny makeup an unexpected, moodier edge while keeping the soft palette. It proves the look doesn’t have to be all pastels and innocence.
- Blend a matte mauve through the crease and smudge a plum shade along the lash line.
- Keep the nose a muted rose so it harmonizes with the deeper eye.
- Swap white inner corners for a soft champagne shimmer to keep some brightness.
ℹ️Good to Know
The rosy nose is the first thing to fade because we touch our noses constantly. A clear setting powder over the cream, then a mist of setting spray, roughly doubles how long it lasts.
Crisp White Inner-Corner Highlight

A dot of crisp white in the inner corners is the single fastest way to get that wide, innocent bunny gaze, and it costs you about ten seconds. It tricks the eye into looking bigger and more awake instantly.
Use a small brush to place a true white or pearl shade in the inner corner of each eye and along the very front of the lower lash line. Blend the hard edge just slightly so it glows softly into the skin.
This one detail does more for the bunny effect than a whole eyeshadow look, and it photographs beautifully. I tell every first-timer to start right here. If you only add one thing from this list to a basic pink nose, make it this white.
Holographic Moonlit Cheekbones

When you want bunny makeup that belongs at a rave or a fantasy shoot, a prismatic, holographic highlight on the cheekbones takes it fully into otherworldly glam. The color-shifting shimmer is pure magic in motion.
- Lay down a sheer base of cream highlighter on the high cheekbones first so the shimmer grips.
- Press a holographic or duochrome powder on top with a flat brush, patting rather than sweeping.
- Carry a little of the same shimmer to the brow bone and cupid’s bow to tie it together.
Rosy Freckled Sun-Kissed Nose

Adding faux freckles over a rosy nose gives bunny makeup a sweet, sun-kissed, outdoorsy charm that feels younger and more natural than glitter. It’s a lovely choice for daytime and spring events.
Tap a warm pink or peach blush over the nose and high on the cheeks, then use a fine brown brow pencil or a freckle pen to dot light, irregular freckles over the top. Vary the size and keep them concentrated on the nose, then set with a light mist so they don’t smear.
Feathered Pastel Bunny Brows

Lightening or tinting the brows with a pastel takes the whole face into a fluffy, fantasy-bunny softness that full glam looks call for. It instantly removes the hard frame your natural brows give and looks dreamy.
You don’t need to bleach anything. Pat a pale, creamy concealer through the brows to mute them, let it set, then brush a pastel brow gel or a soft shadow through the hairs in the same direction they grow.
This step makes the biggest difference in heavy editorial looks and the least in a casual one, so save it for when you’re going all in. For a more everyday glow, a cute Halloween makeup approach keeps your natural brow.
Metallic Bunny-Ear Eyeshadow

A high-shine metallic lid, like a little mirror catching the light, is a bold, camera-ready way to nod to bunny shine without painting actual ears on your face. It’s drama that still stays elegant.
- Dampen a flat brush lightly and press a metallic or foil shadow flat onto the lid for maximum shine.
- Keep the shape simple and rounded so it stays soft and bunny-sweet.
- Pair it with a bare lip and a soft nose so the eyes stay the star.
Cotton Candy Ombre Blush

A draped, ombre blush that fades from pink at the apples up to a sunrise peach gives bunny makeup a dreamy, cotton-candy softness across the whole cheek. It’s the difference between a flat circle of color and a glowing, blended flush.
Start with the deepest pink right on the apples of the cheeks, then layer a peach or coral just above and blend the seam where they meet until there’s no hard line. Carry the very edge of the color lightly toward the temple for lift.
This blended approach reads softer and more expensive than a single blush, and it ties beautifully into a pink nose. On deeper complexions, a draped coral-to-raspberry pairing gives the most lift, because that warmth is what keeps the cheek color from sinking in and vanishing.
Sparkling Lower Lash Line

A touch of sparkle along the lower lash line is the final flourish that makes bunny eyes twinkle and look extra wide-awake. It’s a tiny detail that looks like pure magic in close-up photos and on video.
Pat a fine glitter or a shimmer pencil along the lower lash line, keeping it close to the lashes so it doesn’t drift down the cheek. A sticky cream or a dab of setting spray on the brush first helps the sparkle cling all night so it doesn’t fall as fallout under your eyes.
Styling Tips
A few habits keep bunny makeup looking fresh from the first selfie to the end of the night. None of it is expensive, either, since a drugstore cream blush at $6 to $10 and a white liner around $5 cover the essentials.
Always set the rosy nose and any whiskers with a light mist of setting spray, because the nose and the area around it rub off faster than anywhere else on the face. Build every color in thin layers, since you can always add more, but lifting off one heavy clumpy layer means starting that section over.
Match the intensity to the event, too. A barely-pink nose and a little inner-corner white is plenty for a casual party, while pearls, holographic cheeks, and tinted brows belong at a costume contest or a shoot. For more inspiration in the same playful spirit, browse our Halloween makeup looks, easy Halloween makeup, the wide-eyed doll eye makeup, or the equally cute deer Halloween makeup.
Hop to It and Make It Yours
The best thing about bunny makeup is how far it stretches from a two-minute pink nose to a full holographic fantasy, all built on the same three cues. Pick the version that matches your event and your nerve, and remember that restraint is what keeps it cute.
Start with just the rosy nose and white inner corners this week and see how it feels, then add a detail or two once you’re comfortable. Build it slowly, keep the whiskers light, and you’ll have a look that’s sweet, photogenic, and unmistakably yours.
Don’t Miss These


