The problem with most glitter nails is not the glitter; it is the all-over, one-note wall of sparkle that reads more craft store than salon. The designs that actually look expensive use glitter with restraint, as an accent, a gradient, or a texture against something smooth, so the sparkle has contrast to play against. That single shift is what separates a chic glitter manicure from a tacky one.
These 10 glitter nail designs all use that trick in a different way, from a whisper of chrome-kissed tips to a full jewel-toned marble. Each comes with how it is done, who it suits, and an honest note on cost and the one thing nobody warns you about: glitter is a project to remove. Pick one and let your hands catch the light.
Glitter Nails, the Smart Way
- Glitter looks most expensive as an accent or gradient against a smooth or sheer finish, not packed over every nail.
- Gel is the format of choice, since it locks glitter flat and glossy; regular polish over glitter chips and snags fast.
- A full glitter gel set runs roughly $45 to $75 with art, and lasts two to three weeks.
- Bright and jewel-toned glitter pops hardest against deep skin, so lean into saturation for the most contrast.
- The honest catch: glitter gel takes longer to soak off, so never peel it, or it takes your nail layers with it.
Glitter Tips With a Chrome Kiss

This is the grown-up French for anyone who finds a plain white tip boring. Instead of a classic edge, you build the tip in a fine glitter and finish it with a whisper of chrome so it looks almost liquid where the sparkle catches the light. The bare or sheer base keeps it from tipping into too much, which is the whole reason it looks chic.
The Modern French
It is my go-to suggestion for a first glitter manicure, because the sparkle stays contained to the tip where it is easy to love and easy to grow out. The chrome is what keeps it current instead of dated.
Bright glitter tips pop beautifully on deep skin, and a warm gold or rose chrome flatters richer tones more than an icy silver. It pairs naturally with the ideas in my French tip nails guide.
Sheer, Glazed Glossy Glitter Nails

The glazed-donut trend gave us the prettiest low-key glitter of all: a sheer, milky base dusted with the finest micro-shimmer so the whole nail looks glazed, like glass dusted with light. It is barely-there sparkle, the kind that catches the light only when you move, which makes it work-appropriate and endlessly wearable. Nobody would call it a glitter nail, yet it shimmers all day.
The Glazed Effect
The key is a very fine, almost powder-like glitter or a shimmer topper over a soft nude or milky pink. Anything chunky breaks the glazed effect.
It suits every skin tone since it is so soft, though a warmer milky base flatters deeper skin better than a stark white one.
A Galaxy Ombre With Holographics
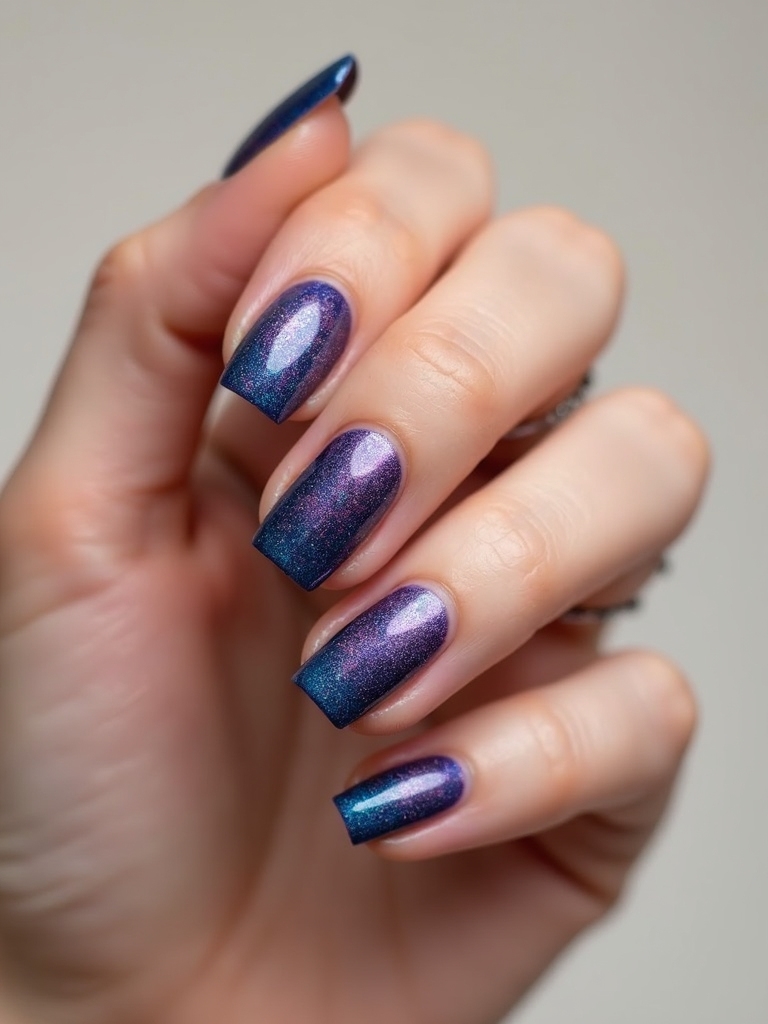
For real drama, a galaxy ombre layers holographic glitter over a deep, dark base so the nails look like a night sky, all shifting flecks of color against near-black. It is a statement set, the kind people ask about, and the holographic sparkle carries the whole look, so no fine painting skill is required. The dark base is what makes the sparkle glow.
This one photographs incredibly and suits a party or the holidays, though the deep base means grow-out shows, so it is more of an event set than an everyday one.
- Sponge a dark base of navy, plum, or black from cuticle to tip.
- Press holographic glitter more densely at the tips, fading toward the cuticle.
- Seal thick and glossy so the multi-tonal shimmer really shifts as your hand moves.
A Minimal Glittered Cuticle Halo

Flipping the usual glitter placement, a cuticle halo sets a thin arc of sparkle at the base of the nail where the tip usually goes. It is fresh and unexpected, and because the glitter sits at the cuticle, grow-out is nearly invisible, which makes it one of the smartest low-maintenance glitter looks. It stays modern and minimal, light on the nail.
- Paint a sheer or nude base across the whole nail first.
- Draw a fine glitter arc hugging the cuticle line with a small brush.
- Keep the arc thin, since a delicate line is what keeps this looking minimal, not messy.
📋How to Keep Glitter Nails Chic
- ✓Use glitter as an accent, gradient, or texture, not packed over every single nail
- ✓Give the sparkle something smooth or sheer to contrast against
- ✓Choose gel over regular polish so the glitter stays flat and glossy
- ✓Match the glitter tone to your skin, leaning warm and saturated on deeper skin
Micro-Glitter Sculpted Arches

This is nail art for anyone who loves a graphic shape: sculpted arches of micro-glitter curving across a sheer nail, like a sparkling rainbow set on its side. The negative space around the arches keeps it airy and editorial, so the glitter looks like intentional design rather than a full sparkle wall. It is playful but still polished.
The precision is what makes or breaks it, so this is one to book a nail artist for unless your brush control is strong and your hand is steady.
- Leave plenty of negative space so the arches feel deliberate and light.
- Use a fine glitter or glitter gel so the curves stay crisp, not clumpy.
- Vary the arch on each nail for a jaunty, hand-drawn feel across the set.
A Single Confetti Accent Nail

The easiest glitter design of all is also one of the most flattering: keep nine nails clean and let a single accent nail go full confetti. That one celebration nail gives you all the joy of glitter with almost none of the commitment, and it is the fastest way to dress up an otherwise simple manicure. It is perfect for a birthday, a party, or just a pick-me-up.
The clean nails are what make the confetti nail sing, so keep the other nine in a simple solid, a sheer nude, or a soft color that lets the sparkle be the star.
Multicolored confetti glitter pops especially hard against deep skin, and you can match the confetti tones to an outfit or an occasion for a custom touch. See my funky nails guide for more playful accent ideas.
💡Placement Tip
If you are nervous about glitter looking heavy, put it where grow-out hides: a cuticle halo or a single accent nail both keep the sparkle contained and grow out almost invisibly, so you get weeks of wear without an awkward regrowth line.
Chunky Glitter Glossy Drip Edges

For maximum fun, chunky glitter dripping down from the free edge turns a manicure into wearable art. The larger, chunky flakes catch the light dramatically, and letting them drip unevenly from the tip keeps the whole thing loose and playful. It is a bold, festival-ready look that photographs like a party. The trade-off is texture, since chunky glitter is bumpy and needs a thick seal.
- Paint a glossy base color first so the drips have something smooth to fall from.
- Build chunky glitter down from the tip, thinning it out as it drips toward the middle.
- Seal with several thick top coats, since big flakes snag on everything without a smooth finish.
Crystal-Capped Glitter Moons

A glitter half-moon at the base of the nail, capped with a tiny crystal or two, is jewelry for your hands. This look revives the vintage half-moon manicure with a modern, sparkly twist, and the little crystals add a three-dimensional, luxe finish that feels special-occasion. It is elegant enough for a wedding yet still fun.
Keep the rest of the nail sheer or a soft nude so the sparkling moon and its crystals stay the focus. Press-on crystals need a gel top coat or a dot of nail glue to stay put, and going lighter with the crystal count usually looks more refined than a heavily studded nail. On deep skin, a warm gold glitter moon reads especially rich against the crystals.
ℹ️Good to Know
Glitter gel takes noticeably longer to remove than plain gel because the flakes block the acetone from reaching the base coat. Budget extra soak time at your appointment or at home, and never speed it up by peeling, which strips your natural nail.
Matte Base, Glossy Glitter Stripes

The clever contrast here is texture: glossy glitter stripes laid over a matte base, so the sparkle really jumps against the flat, velvety finish. That matte-versus-shine trick is what makes this look so striking, and the simple stripe keeps it graphic and clean. It is a favorite for anyone who likes a design with a little architectural edge.
- Paint your color and set it with a matte top coat for the velvety base.
- Lay glitter stripes on top with striping tape or a fine brush, then gloss only the stripes.
- Keep the stripes clean and few, since one or two per nail beats a busy grid.
A Jewel-Toned Glitter Marble

The most luxe glitter design swirls jewel-toned colors into a marble pattern shot through with fine glitter, so the nails look like polished gemstones. Emerald, sapphire, and amethyst marbling with a dusting of gold glitter reads rich and expensive, like malachite or lapis carved into a manicure. It is the glitter look for someone who wants sparkle that feels grown-up and jewel-box special.
- Swirl two or three jewel tones on the nail while the gel is still wet, using a fine tool.
- Drop fine gold glitter into the swirls so it looks embedded, like veining in stone.
- Lean into rich, saturated jewel tones on deep skin, where they glow like real gemstones. My chrome nails guide covers more metallic finishes.
What to Expect
Before you book, here is the honest picture. A glitter gel manicure with some art usually runs about $45 to $75 depending on how intricate the design is and where you live, and it holds up for two to three weeks like any gel.
Press-on glitter nails are the budget-friendly route at roughly $5 to $25 and let you wear a bold design for a night without the commitment. Whichever you choose, glitter reads most expensive when it is used with restraint, so resist the urge to cover every nail unless a full sparkle wall is truly the goal.
The one thing nobody warns you about is removal. Glitter gel is noticeably harder to soak off than plain gel, because the flakes resist the acetone, so it takes longer wrapped in foil and a little patience. Never, ever peel or scrape it off; that pulls the top layers of your natural nail away with it and leaves them thin and weak.
Soak longer instead, gently nudge the softened glitter off with a wooden stick, and give your nails a little cuticle oil afterward. Go in knowing the removal is a project, and glitter nails are pure joy from the first sparkle to the last.
Let Your Hands Catch the Light
The secret running through all ten of these is the same: glitter looks its best when it has something to play against, whether that is a sheer base, a matte finish, or nine clean nails around one confetti accent. Use it with a little restraint and even the boldest sparkle looks polished and deliberate.
So pick the design that made you want to sparkle, whether that is a subtle glazed shimmer or a full galaxy ombre, and go for it, keeping the removal truth in mind. A little glitter is one of the quickest, happiest ways to make an ordinary week feel like a celebration.