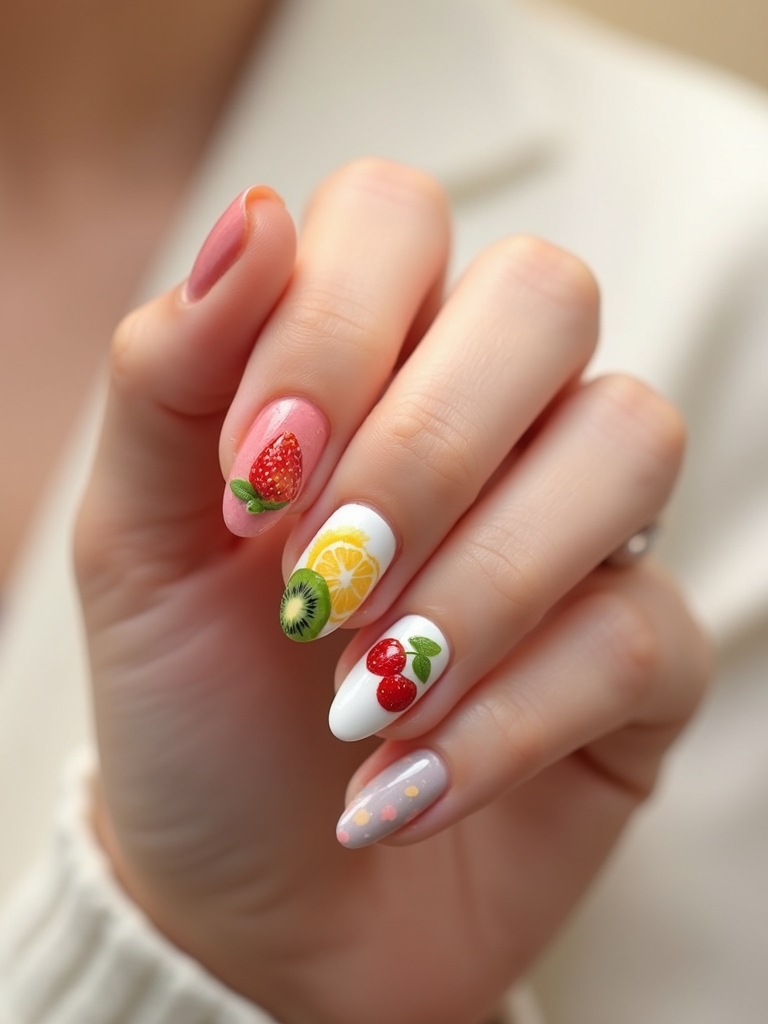
I’m sharing 13 micro fruit nail ideas that keep things playful yet polished. Think sheer bases with crisp tiny motifs—strawberries, cherries, citrus, and kiwi—placed near cuticles, corners, or smile lines for airy balance.
I mix glossy with matte, vary scale per nail, and use fine brushes or decals for sharp detail. These designs wear well across seasons and suit short or long nails. If you want subtle color pops without bulk, you’ll want to see how each look comes together.
Sheer Nude With Tiny Strawberry Accents

Although minimal, sheer nude nails with tiny strawberry accents deliver a fresh, polished look that works year-round.
I keep the base translucent, then place one or two micro berries per nail for balance.
Use fine dotting tools, a thin brush, and a glossy topcoat.
Vary placement—cuticle, corner, or center—for subtle interest.
Mix greens softly, keep seeds tiny, and scale berries to your nail length.
Micro fruit nail designs are a playful way to freshen up your manicure, especially when you add tiny strawberry nail ideas for seasonal inspiration.
French Tips Topped With Mini Cherries

I start with a classic white tip base so your nails look crisp and balanced.
Then I place tiny cherries just above the smile line—one or two per nail keeps it chic, not crowded.
I seal everything with a glossy topcoat for lasting shine and a smooth, gel-like finish.
Cherry nails are perfect for adding a playful, seasonal touch to any manicure, and they work well with mini fruit accents for a cohesive look.
Classic White Tip Base
Because a crisp base makes tiny art pop, I start with classic white French tips and layer on micro cherries for a fresh, seasonless twist.
I keep the smile line thin, bright, and even—sheer pink underneath, opaque white at the edge.
I choose a glossy top coat for shine or velvet matte for chic contrast.
Short or long nails work, square or almond.
It’s timeless, playful, and polished.
French Nails are a staple of cultivated nail aesthetics and versatile everyday wear, often celebrated for their effortless elegance.
Tiny Cherry Placement
A few well-placed cherries make French tips feel intentional, not busy. I cluster tiny pairs near the smile line, then stagger singles to keep rhythm.
Think balance, not symmetry. I keep stems fine and leaves minimal so the fruit reads crisp without crowding.
- Place two cherries per hand as accents
- Offset on alternating nails
- Use a micro-dotting tool
- Keep stems thin, leaves smaller
French tips are a classic choice that pairs well with tiny fruit accents for a chic finish, especially when emphasizing French Tip Nails in the overall design.
Glossy Topcoat Finish
Often the gloss is what makes the cherries pop and the French feel intentional.
I seal everything with a thin, self-leveling topcoat, capping free edges to prevent chips.
I wait 60 seconds after art to avoid smearing.
For depth, I float a second coat on thumbs.
Choose non-yellowing formulas.
If you prefer soft shine, use a gel topcoat and wipe dispersion for glassy, durable brilliance.
A high-gloss finish is key to achieving that modern Wet Look Nails shine that lasts.
Negative Space Citrus Slices

While I love bold fruit art, negative space citrus slices let nails breathe and still pop. I frame slim crescents of lime, lemon, or orange along the edges, leaving sheer space for a modern finish. Keep lines crisp, colors zesty, and proportions tiny so they read chic, not cartoon.
- Use a fine liner and soft sheers
- Anchor slices at corners
- Mix citrus tones sparingly
- Seal with glossy topcoat
Lemon nail designs are a cheerful way to brighten a manicure and add playful seasonal flair with small, detailed motifs like wedges and slices, often paired with subtle backgrounds for contrast and balance — see Lemon Nail Designs for inspiration.
Watermelon Seed Micro Dots
I start with a juicy pink base and keep the seeds minimal—just a few precise micro dots per nail.
To balance the negative space, I place dots closer to the cuticle or off-center for a natural look.
For a polished finish, I add thin glossy rind accents at the tip or side to suggest the slice without clutter.
Soft milky nails are a great neutral complement to playful micro fruit designs, offering a subtle everyday elegance that keeps the look fresh without overpowering the motifs.
Minimal Seed Placement
Because negative space does the heavy lifting, I place just one to three tiny black “seeds” per nail to suggest watermelon without crowding the design.
I stagger dots near the tip or sidewall for balance, using a micro brush and glossy top coat for crisp contrast.
Keep spacing intentional so each dot reads purposeful, never random.
- Map placement before painting
- Vary positions across hands
- Anchor with top coat
- Clean edges with acetone pen
Polka dot nail designs also inspire this look with playful polka dots to keep it fresh and eye-catching.
Juicy Pink Base
Often the trick to believable “watermelon” is nailing the pink. I choose a juicy, mid-tone pink—warm, not neon.
Two thin coats keep it crisp and chip-resistant. If your skin runs cool, lean rosier; warmer tones suit coral-pink.
Sheer formulas read fresher; creams look bolder. Cap tips for longevity. Let polish fully dry before adding micro seed dots. Finish with quick-dry topcoat.
Glossy Rind Accents
A crisp rind line makes the pink pop—and sets up glossy seed dots.
I paint a slim green curve, add a whisper of white, then dot tiny black seeds with a glossy top. Keep spacing even and scale minimal so it reads chic, not costume.
- Use a striping brush
- Seal with gel topcoat
- Dot with a toothpick
- Offset seeds diagonally
Pastel Skittles With Mixed Micro Fruit

From soft lemon to misty lilac, I treat each nail like a Skittle and top a few with tiny citrus slices, berries, or kiwi slivers for a playful mix.
I balance pastels evenly and rotate fruit so the look feels intentional. Keep two nails fruit-free for breathing room. Seal with a glossy topcoat. Short or long, square or almond, this palette-flatters year-round.
Milky Glaze With Mini Blueberries

Sometimes I swap sheer white for a milky glaze, then dot on mini blueberry decals or hand-painted berries for crisp contrast. The cool blue pops against the creamy base, reads chic in any season, and pairs well with short or almond shapes.
Keep the glaze thin, let berries shine, and seal with glossy topcoat.
- Use two berry sizes for depth.
- Add tiny leaves sparingly.
- Anchor accents near cuticles.
- Finish with cuticle oil.
Glossy Black Seeds On Jelly Pink

Think fresh-cut fruit vibes and dial up shine: I lay a sheer jelly pink base, then dot glossy black “seeds” for graphic punch that still feels soft.
I keep dots tiny and spaced; they read crisp, not cartoon. Use a dotting tool or bobby pin. Seal with a high-gloss topcoat. Try accent nails or a full set. Works on shorties, gels, or natural. Effortless, chic, seasonless.
Micro Fruit Half-Moons

With a wink to vintage manis, I paint tiny fruit slivers as half-moons at the cuticle—lemons, limes, or strawberries pared down to minimalist arcs. I keep bases sheer or milky, then tuck the micro slices tight to the lunula for a crisp curve.
The look reads polished, playful, and wearable year-round.
- Use a fine liner and dotting tool
- Anchor with quick-dry topcoat
- Alternate fruits per nail
- Scale to shorter lengths
Chrome Accents With Tiny Limes

Although chrome can skew bold, I keep it refined by pairing mirror accents with micro lime wedges.
I place slim chrome swipes on two nails, then add tiny lime slices near tips for balance.
Keep negative space, choose sheer nude or milky white, and seal with glossy topcoat.
Mix silver or champagne chrome.
Scale limes small, keep edges crisp, and space them evenly.
Minimalist Kiwi Cuticles

For minimalist kiwi cuticles, I suggest a Fresh Green Gradient that fades softly from cuticle to tip.
I add Tiny Seeds Accent with micro dots near the center nail for a crisp, fruity nod.
To keep it airy, I use Negative-Space Half Moons at the base so the look stays clean and wearable.
Tiny Seeds Accent
Sometimes the smallest detail makes the biggest impact, and a tiny-seed accent at the cuticle gives kiwi vibes without a full fruit motif. I paint a neutral base, then dot two or three micro black seeds near each cuticle for a crisp, modern wink.
- Use a toothpick for pinpoint dots.
- Seal with glossy top coat.
- Keep seeds asymmetrical.
- Pair with sheer beige or milky green.
Fresh Green Gradient
With a wash of meadow to lime, I blend a fresh green gradient that hugs the cuticle and fades to clear tips—think minimalist kiwi without the slices.
I sheer the first coat near the lunula, deepen color mid-nail, then float a glossy topcoat. Keep edges crisp with a cleanup brush. Pair with short, rounded shapes. It’s quick, chip-smart, and photo-friendly year-round.
Negative-Space Half Moons
That soft green fade sets the stage; I switch to negative-space half moons that read like minimalist kiwi cuticles.
I leave the lunula bare, outline it with a thin lime arc, then seal with glossy top coat.
The result feels crisp, breathable, and polished—never busy. It pairs with any length and suits every season.
- Use sheer base, quick dry.
- Keep arcs ultra-thin.
- Balance on all nails.
- Finish with cuticle oil.
Rainbow French With Micro Fruit Charms

Often, I swap a classic French tip for a rainbow arc and tuck in micro fruit charms for a crisp pop.
I map shades from thumb to pinky, keep arcs thin, and anchor charms near the smile line.
Use a sheer base for lift, glossy topcoat for seal.
Mix citrus, berries, or kiwi.
Balance hands symmetrically.
Short or long nails work.
Refresh chips quickly.
Matte Base With Tiny Pineapple Nails

Though I love glossy finishes, I reach for a velvety matte base to make tiny pineapple accents punchy and modern.
I keep the art minimal—one or two fruits per hand—so the texture leads.
Soft taupe, sage, or petal pink let yellow pop without skewing neon.
Finish with a matte top coat to seal crisp lines.
- Use a micro detail brush
- Keep pineapples thumbnail-sized
- Dot metallic for leaves
- Balance negative space
Press-On Decals For Ultra-Fine Fruit Art

When I want ultra-fine fruit without steady-hand stress, I reach for press-on decals. I prep with a thin base coat, then place slices—strawberry seeds, citrus wedges, tiny cherries—using tweezers. I seal with a quick-dry gel top coat for a glassy hold.
Mix matte and glossy accents, offset placements, and negative space. Rotate palettes seasonally. Remove with warm water soaks or peel-off base.