When I want impact fast, I reach for black—smoky lids, crisp wings, and glossy centers that shift with the light. I’ll show you how to map, blend, and set each look so it lasts, from tightlining basics to graphic negative space.
We’ll start simple, then build toward bolder techniques like inky cut creases and glitter-topped noir. I’ll flag the brushes, textures, and timing that matter most—so your liner won’t budge when it counts. Ready for step one?
Classic Black Smoky Eye

Almost always, I start a classic black smoky eye by building a clean, grippy base.
I prime lids, set lightly with translucent powder, then map a soft taupe gradient in the crease.
I smudge black kohl along the lash line, blend upward with a small brush, and pack matte black on the lid.
I blend edges, add lower-lash smoke, highlight inner corners, and finish with mascara.
Smokey eye techniques can be adapted for an evening look by layering pigments and focusing on smokey eye makeup for a sultry finish.
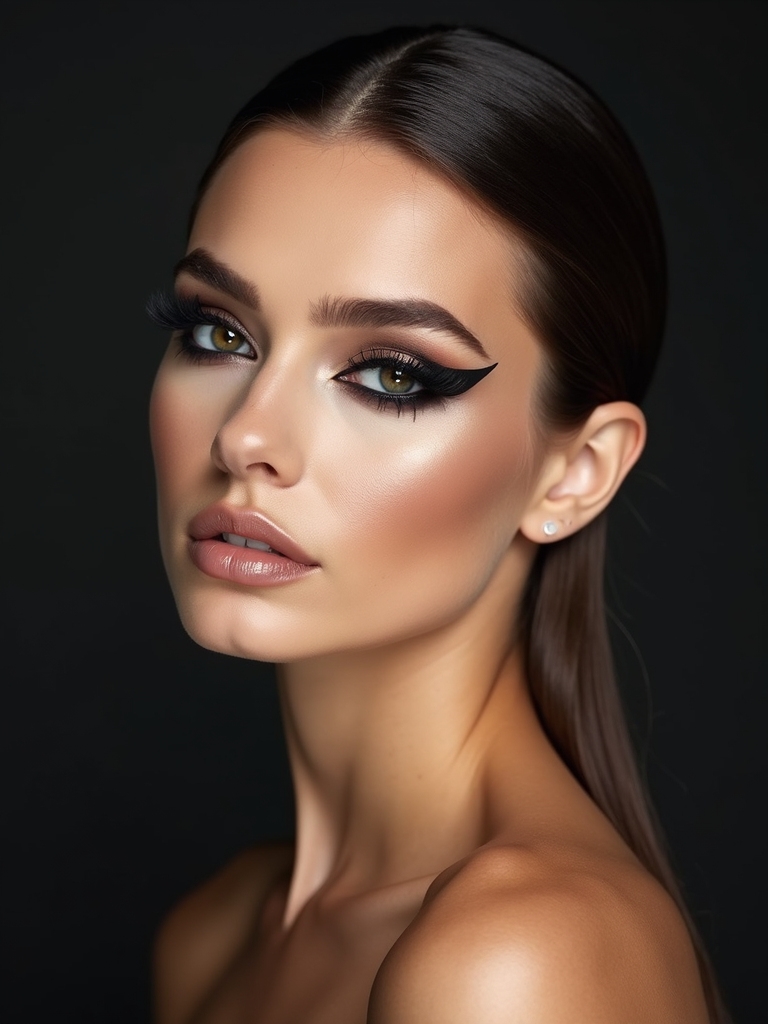
Sharp Winged Liner

For a sharp winged liner, I start by choosing the right angle—align the wing with your lower lash line toward the tail of your brow.
Next, I create crisp edges using tape or a card as a guide, then sketch the wing with short strokes before filling it in.
To keep it clean all day, I set the liner with black shadow and seal the edges with a smudge-resistant gel or liquid.
Practice perfects the flick, so repeat the motion until you can reproduce a consistent angle every time.
Choosing the Right Angle
Even before I pick up my liner, I decide the wing’s angle, because that single choice shapes the whole look. I sit straight, then follow three steps: align the wing with my lower lash line, aim toward the tail of my brow, and match both eyes.
For lift, tilt higher; for elongation, go slightly flatter. I sketch a faint guide, assess symmetry, then commit. Fox eye looks often use a lifted, elongated shape to create that sultry, upward sweep fox eye.
Crisp Edges Technique
Lock in a razor-sharp wing by prepping the canvas and setting clean boundaries.
I cleanse lids, apply a thin primer layer, then map the wing with a tiny dot at the outer corner.
I place tape or a card as a guide, align with my lower lash line, and draw upward.
I sketch the outline first, fill slowly, perfect the inner corner, then remove the guide.
A steady hand and the Crisp Edges Technique help ensure a professional finish.
Long-Wear Smudge Control
With the edges crisp and the wing mapped, I keep it budge-proof from morning to midnight.
I tightline with a waterproof pencil, then set it with matching black shadow.
I press gel liner for the wing, not drag.
I lock everything with a micro-fine setting powder.
I mist setting spray, eyes closed.
Blot oil through the day, never rub—tap to refresh.
Smoky black eye makeup can be intensified by layering and blending smoky black eye makeup for bold evening looks.
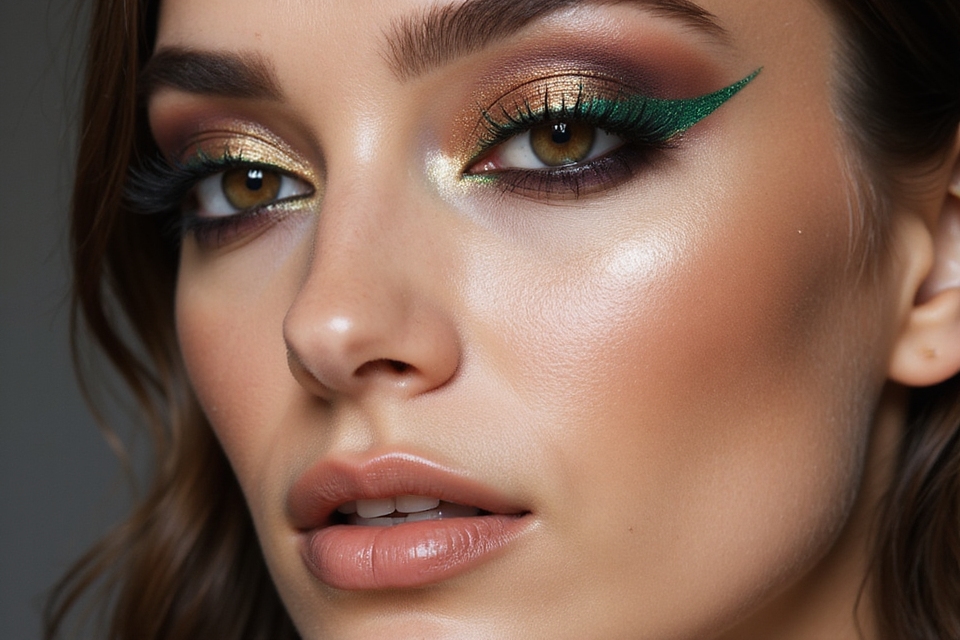
Graphic Negative Space Liner

I’ll show you how to sketch clean cutouts with crisp edges, then lock them in so they stay sharp.
Next, we’ll map bold geometric shapes—think floating lines and cut creases—using light guidelines before inking.
Finally, I’ll share long-wear smudge control tips so your negative space liner looks fresh all day.
You can adapt these techniques to any eye shape by understanding basic eye makeup principles and tailoring application accordingly.
Clean Cutouts Precision
Although it looks intricate, Clean Cutouts Precision is about crisp shapes and intentional empty space that make black liner feel modern and sharp.
I start with clean lids and a thin mapped outline. I sketch edges with a fine-tip pen, then carve negative space using micellar on a pointed swab. I refine symmetry, fill only where needed, set with translucent powder, and finish with tightlined lashes.
For hooded eyes, emphasize placement and lift to prevent the liner from disappearing into the crease by focusing on brow bone placement.
Bold Geometric Shapes
Clean edges don’t just frame the eye—they become the design when I switch to bold geometric shapes and graphic negative space.
I map lines with a light pencil, then trace with inky precision.
I keep symmetry by checking straight-on and adjusting angles.
- Triangle wings that hover above the crease
- Floating rectangles framing the pupil
- Negative-space circles cut from a thick liner band
Bold shapes work especially well with sharp contrast to emphasize form and structure.
Long-Wear Smudge Control
Because crisp negative space only works if the edges stay put, I prep for longevity before I draw a single line.
I degrease lids with micellar water, then press on a gripping eye primer.
I sketch the negative space with a transfer-proof gel, set with black shadow.
I lock edges using a fine brush and translucent powder.
Finally, mist setting spray.
Korean techniques often emphasize natural enhancement and soft sculpting to create definition without harsh lines.
Glossy Black Lids

Sometimes a slick, inky lid is all you need, and glossy black makes it look modern and editorial. I prep lids, lay down a thin black cream shadow, then tap on clear gloss only at the center to avoid creasing.
Keep edges clean and lashes defined so shine stands out. Blot gently if it travels.
- Vinyl mirror-sheen lids
- Ink-pool depth
- Spotlighted black arcs
I prefer quick techniques for everyday looks and always start with simple eye makeup to ensure longevity.
Inky Cut Crease
Though it looks dramatic, an inky cut crease is all about crisp mapping and control.
I start by sketching the crease with a cool black pencil, eyes open, following my socket.
I set the line with matte black shadow.
Then I carve the lid using concealer, pressing on black gel liner.
I blend edges upward softly, add matte highlight, and finish with mascara.
A sharp cut crease can be adapted for different occasions by adjusting intensity and edge softness to create a variety of eye makeup looks.
Smudged Rocker Rim

Let’s switch to a Smudged Rocker Rim by starting with lived-in kohl edges—line the upper and lower lashes, then gently smudge with a cotton bud.
Next, run the pencil along the waterline and blur the edges for a soft, smoky waterline.
I’ll show you how to balance the haze so it looks intentional, not messy.
Natural eye makeup favors techniques that enhance without heavy layering, so keep blending minimal and skin-fresh to maintain a natural finish.
Lived-In Kohl Edges
A lived-in kohl edge gives black eye makeup that effortless, smudged rocker rim—defined but undone. I trace creamy black along the lash line, then soften with a fingertip.
I keep the outer corners slightly winged and let edges blur. To lock it, I tap a matching shadow over top, pressing not sweeping.
1) Velvet-black haze
2) Slept-in glamour
3) Softly frayed outline
This approach pairs well with soft eye makeup for a wearable everyday look.
Smoky Waterline Blur
Because the waterline sits close to the eye, I start clean and precise, then build the blur. I dry the rim with a cotton swab.
I trace black gel pencil on upper and lower waterlines. I blink to transfer. I soften edges using a tiny smudge brush.
I set with matte black shadow. I clean corners. I add mascara. Done—smoky, balanced, and durable. Many looks use dark eye makeup to create bold, dramatic intensity.
Double Wing Drama
Start by mapping out two clean, sharp flicks that mirror each other above and below the outer corner—this is the double wing. I anchor my elbow, sketch guides with a pencil, then trace with matte black liquid liner.
I keep spacing slim, ends tapered, and inner lids clean. Finish with mascara to balance the lift and lock the lines.
1) Inky arrows lifting outward
2) Negative space between wings
3) Glossy lashes framing wings
To maintain that captivating doll-like look, focus on enhancing the eye shape with a soft, wide-eyed highlight under the brow and on the inner corner.
Black Cat Eye With Inner Flick

Those twin wings set the stage for a sleeker classic: the black cat eye with an inner flick.
I start with a tight line across the lashes, then sketch a short upward wing. I connect and fill.
Next, I angle inward, drawing a tiny point at the tear duct.
I balance both sides, clean edges with a cotton bud, and set with black shadow.
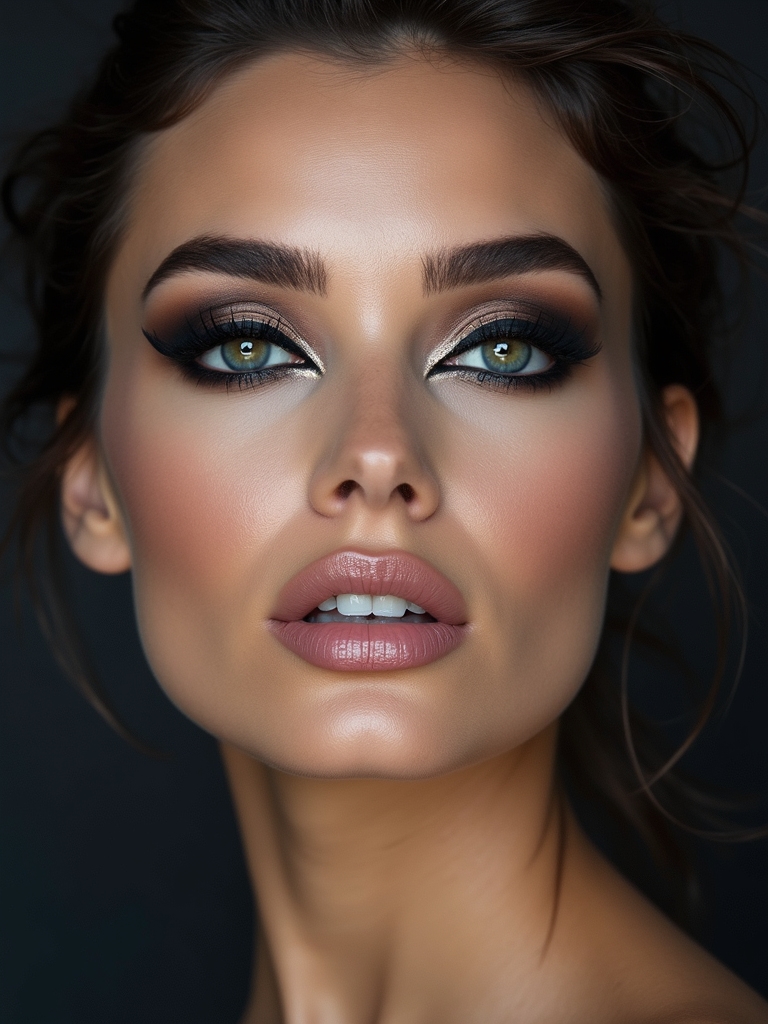
Monochrome Matte Black Eye
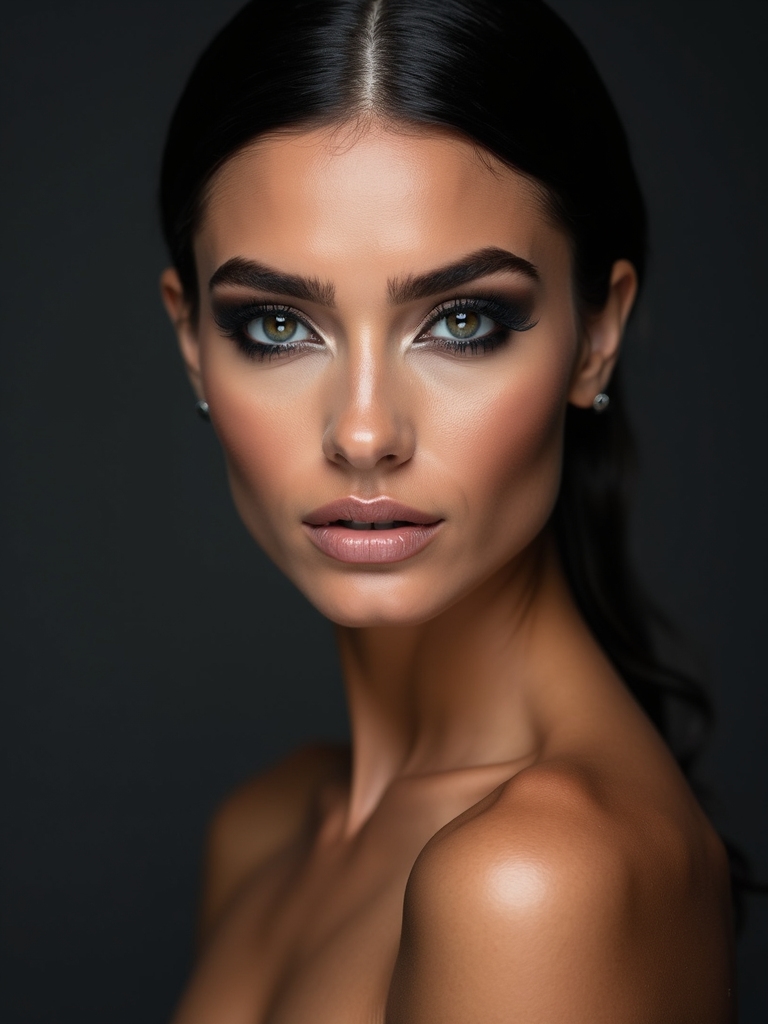
Let’s build a monochrome matte black eye with a seamless all-matte finish: I prep lids, pack on matte black shadow, and blend edges until they look soft and uniform.
Next, I map and ink precise winged lines that stay razor-sharp against the matte base. To lock long-wear smudge control, I set liner with matching matte shadow and seal everything with a targeted setting spray.
Seamless All-Matte Finish
A seamless all-matte black eye looks modern, sculpted, and surprisingly wearable when I build it in thin, even layers. I prime lids, tap on matte black shadow, then blend edges with a clean brush. I keep everything velvety—no shimmer—so the shape feels refined and balanced.
1) Soft haze wrapping the crease
2) Ink-dark lid diffused to smoke
3) Feather-light gradient melting outward
Precision Winged Lines
After sculpting that seamless matte haze, I sharpen the look with precise winged lines in the same deep black.
I map the angle from lower lash line to brow tail, then sketch a thin guide. I anchor at the outer corner, draw the wing outward, and connect to mid-lid. I fill, refine the tip, tighten the upper waterline, and balance both eyes.
Long-Wear Smudge Control
Usually, I lock this look in layers so it won’t migrate. I start with an oil-free primer, then tightline with waterproof gel. I press matte black shadow to set, and finish with a sealing mist. Blot edges; don’t rub. Touch up with a cotton swab.
- Velvet-black lids under cool gallery lights
- Crisp, smoke-free edges at midnight
- Fresh liner after a full commute
Halo Eye in Jet Black

Often, I start a jet‑black halo eye by mapping the shape so the glow looks intentional, not messy.
I sketch the outer and inner corners with black, leaving the center bare. Then I blend edges upward, keeping the middle clean. I pack matte black on corners, soften seams, and tap a lighter shimmer on the center. Finish with liner and mascara.
Soft Diffused Kohl Look

Sometimes I want black eyes that look lived‑in, not sharp, so I reach for kohl and keep it soft. I sketch the pencil along upper and lower lash lines, then smudge with a fingertip or brush, letting edges blur. I set lightly with matte black shadow and clean the outer corner for lift.
- Hazy rims hugging lashes
- Diffused wings whispering out
- Velvet smoke at waterline
Glitter-Topped Noir Smoky Eye

Pack depth first, then let it shine: I build a classic black smoky base and press micro-glitter on top so the darkness smolders beneath a wet-look twinkle.
I prime lids, pack matte black, and blend edges softly. I tightline, add black pencil to the waterline, then set. I tap glitter adhesive on the center, press micro-glitter, and anchor with mascara. Cleanup fallout; seal with setting spray.
Floating Crease Liner

After that glittery smoky moment, I switch gears to a crisp, graphic look: the floating crease liner. I map the arc above my crease with a light pencil, then trace it with inky gel for sharp contrast.
I keep the lid clean, anchor the ends, and balance both eyes.
- A lifted, inky arc hovering above the crease
- Clean lids amplifying negative space
- Symmetrical wings sculpting the gaze
Black Tightline With Bare Lid

Though it looks barely there, black tightlining makes my lashes look fuller and my eyes sharper without any visible liner.
I curl my lashes first, then use a waterproof black pencil. I gently lift my lid and press color into the upper waterline, root to root. I blink to set, clean smudges, and skip shadow. I finish with mascara, focusing at the base for lift.
Black Ombré Outer V

My tightlined, bare lid sets a clean base, and now I build depth with a black ombré outer V.
I sketch a soft V at the outer corner with a matte black, then blend inward with charcoal, fading to smoke.
I keep the inner lid clean for contrast and lift.
- Feathered wing shadow hugging the lashline
- Smoky gradient melting inward
- Crisp inner lid brightness