
The first time a nervous client let me put cobalt on her lash line, she gasped at the mirror, her brown eyes suddenly looked lit from within. That’s the thing about blue: it makes every eye color pop, and it photographs like nothing else.
Blue eye makeup has shed its dated reputation entirely. From a sheer baby-blue wash to a glossy royal lid to a sharp cobalt wing, here are the modern ways to wear it, with the technique behind each and how to make blue flatter any skin tone instead of overwhelming it.
Blue Eye Makeup, the Short Version
Blue flatters every eye color by contrast: it makes brown eyes glow, deepens green, and intensifies blue. The contrast does the work. The trick is choosing the right blue and keeping the rest of the face clean so it stays chic.
Modern blue is about finish and placement, a thin cobalt line, a smoked sapphire, a glossy royal lid, rather than a wall of frosty eighties shadow. Done with a light hand, it reads chic and current, not dated.
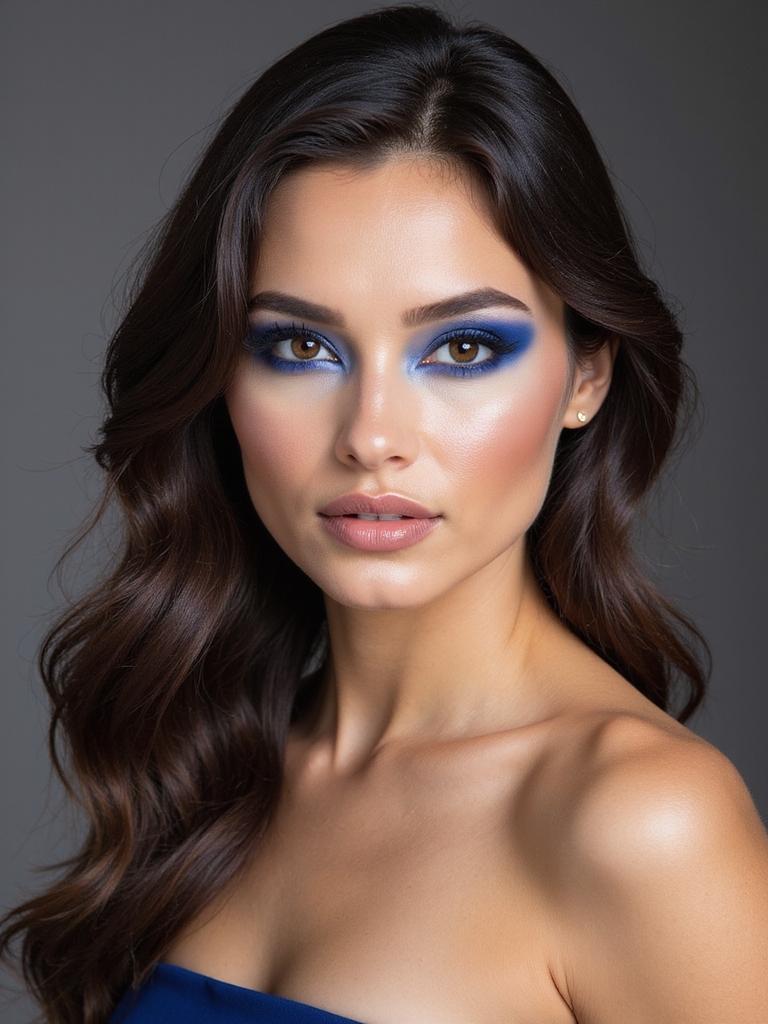
Electric Cobalt Winged Liner

A cobalt wing is the easiest way into blue: all the structure of a classic cat-eye, just in electric blue instead of black. The bright line defines the eye while adding a jolt of color, and it flatters every eye shade, glowing especially against brown eyes.
- Use a vivid cobalt liquid or gel liner for the crispest line.
- Stamp the wing angle first, then connect it to a thin line.
- Keep the rest bare so the blue stays the whole statement.
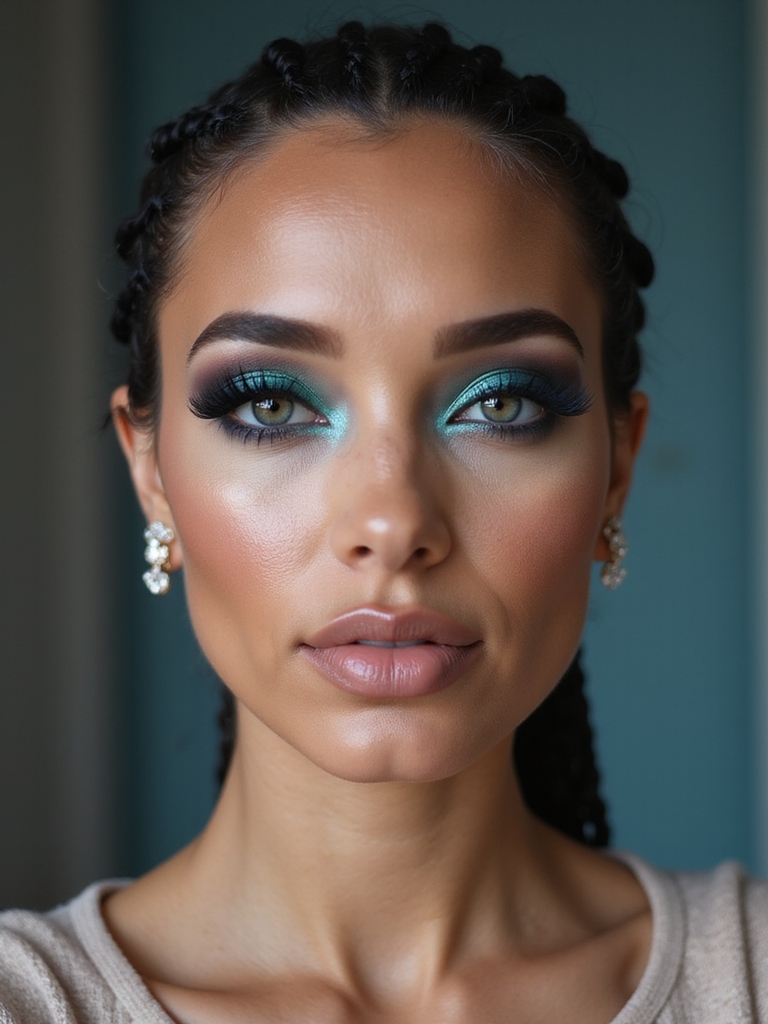
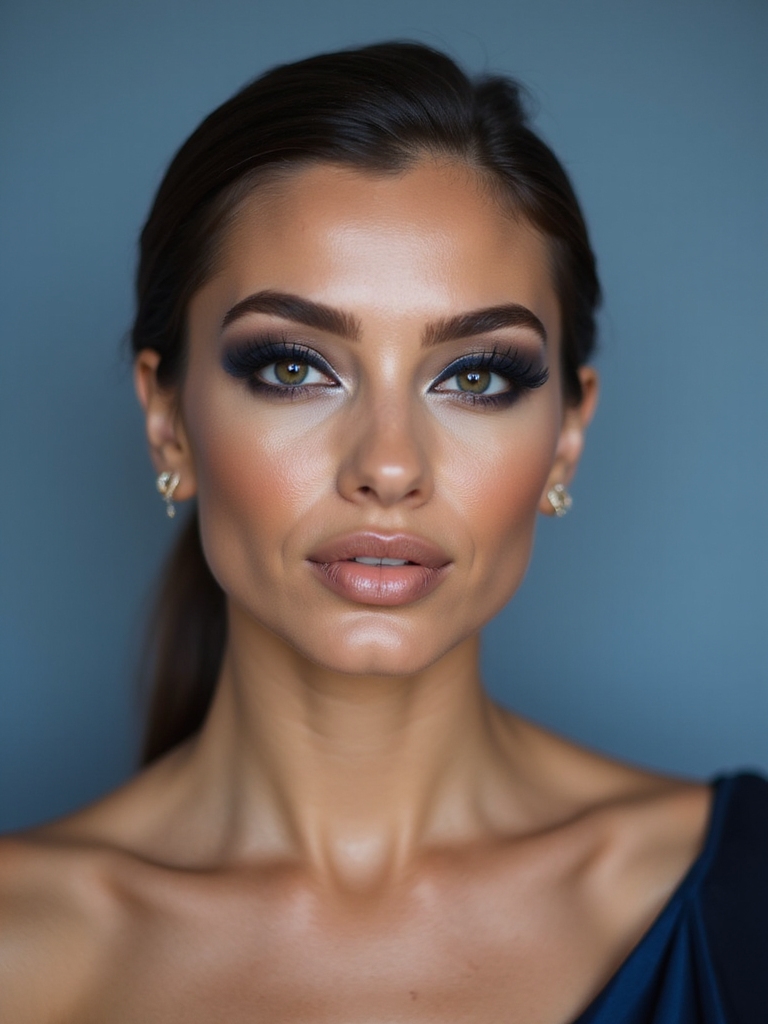
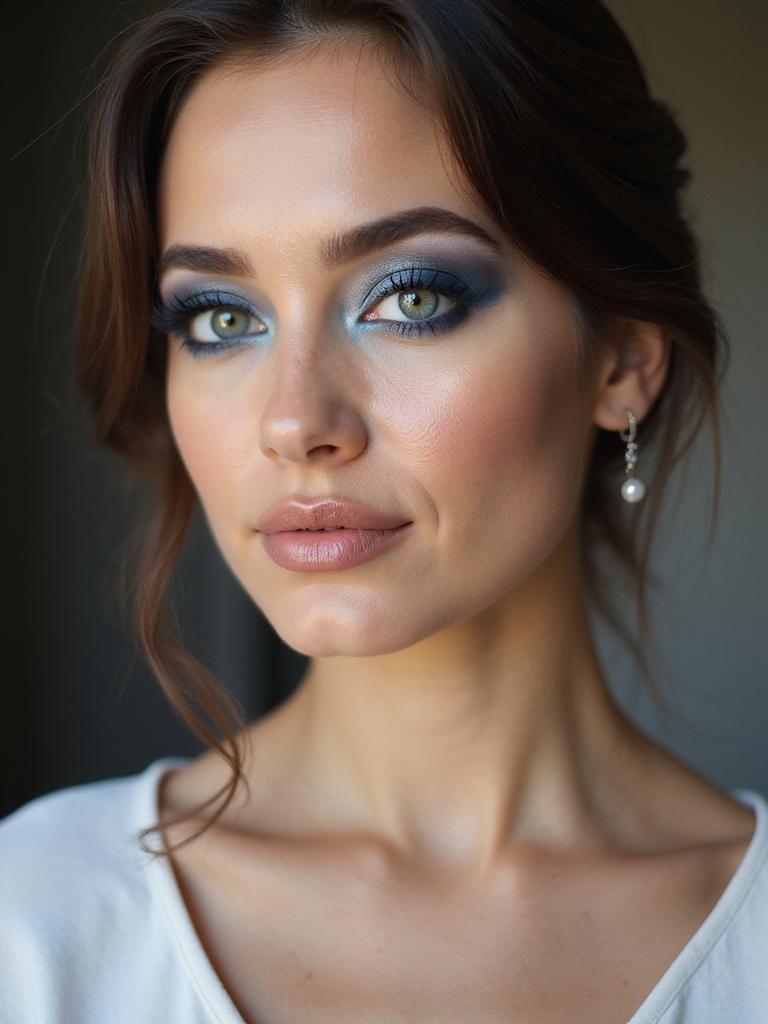
Deep Sapphire Smoky Eyes

A sapphire smoky eye is the grown-up, sultry way to wear blue. Swapping black for a deep, inky blue keeps all the drama of a smoky eye while adding rich color, and the depth means it never looks like a frosty throwback.
- Build a deep sapphire on the lid and smudge the edges soft.
- Carry it under the lower lash line to connect the smoke.
- Deep blue flatters every skin tone and intensifies blue eyes.
A few blue terms worth knowing.
📖Cobalt
A vivid, electric primary blue; the boldest, most eye-popping option.
📖Duochrome
A pigment that shifts between two colors, like blue and green, as you move.
📖Floating liner
A line drawn above the crease, leaving the lid bare, for a graphic effect.
Sheer Baby-Blue Wash

For something soft and modern, a sheer baby-blue wash is pure spring. A translucent pale blue swept over the lid looks dreamy and fresh, the no-pressure way to try blue. No bold pigment required.
- Use a sheer cream or pressed pigment for a soft, see-through wash.
- Keep it light and blended so it looks dewy, not chalky.
- On deep skin, choose a more pigmented pale blue so it shows.
Teal Inner-Corner Pop
The smallest dose of blue can do the most. A pearly teal dotted in the inner corner brightens the whole eye and adds a pop of unexpected color, perfect for anyone who wants a hint of blue rather than a full lid.
It sits right where the eye opens, so you look instantly wide-awake. Pair it with a neutral eye and the teal becomes a tiny, jewel-like surprise.
- Press a pearly teal into the inner corner with a fingertip.
- Keep the rest of the eye neutral so the pop stands out.
- Teal glows beautifully against warm and deep skin.
Blue is the most underrated color in makeup. It makes every eye color pop by contrast, brown especially, and a thin line or a smoked lid reads chic, not dated.
Navy on the Waterline

Lining the waterline in navy instead of black is a stylist’s trick for subtle color. Navy is soft enough to pass almost as a deep neutral, but it brightens the whites of the eyes and adds a quiet blue glow that black can’t.
Navy Versus Black
It’s the most office-friendly blue here, with subtle color and the placement is small. Most people won’t clock it as blue, just that your eyes look brighter and more defined.
Use a creamy navy pencil and set it with a matching powder so it doesn’t smudge. This is the one I recommend to clients who think blue isn’t for them, since it’s foolproof.
Sky-Blue Matte

A matte sky blue is the modern, grown-up update to powder blue, all soft color with none of the frosty shimmer that dated the eighties version. Blended cleanly across the lid, it looks artistic and current.
- Choose a matte, not frosty, sky-blue shadow for a modern finish.
- Blend the edges so the color fades softly into the crease.
- A clean, bare face keeps the matte blue chic.
📋Wear Blue Without It Looking Dated
- ✓Keep the rest of the face bare so the blue is the only bold thing.
- ✓Choose modern finishes: matte, glossy, or metallic over frosty.
- ✓Use one good pigment; cheap blue goes chalky and patchy.
Blue Glitter Cut Crease

For full glam, a blue glitter cut crease is a showstopper. The sharp cut line plus a wet-look blue glitter lid catches light with every blink, it’s made for a party. Maximum sparkle, minimum subtlety.
Carve the crease with concealer, then press blue glitter onto the lid over a sticky base so it stays put. The glitter is the whole point, so keep the rest of the face soft.
It takes about fifteen minutes and some practice, so it’s a weekend look. Worth the effort. A vivid blue glitter against the skin reads bold and celebratory, especially under party lights.
Cerulean Floating Liner
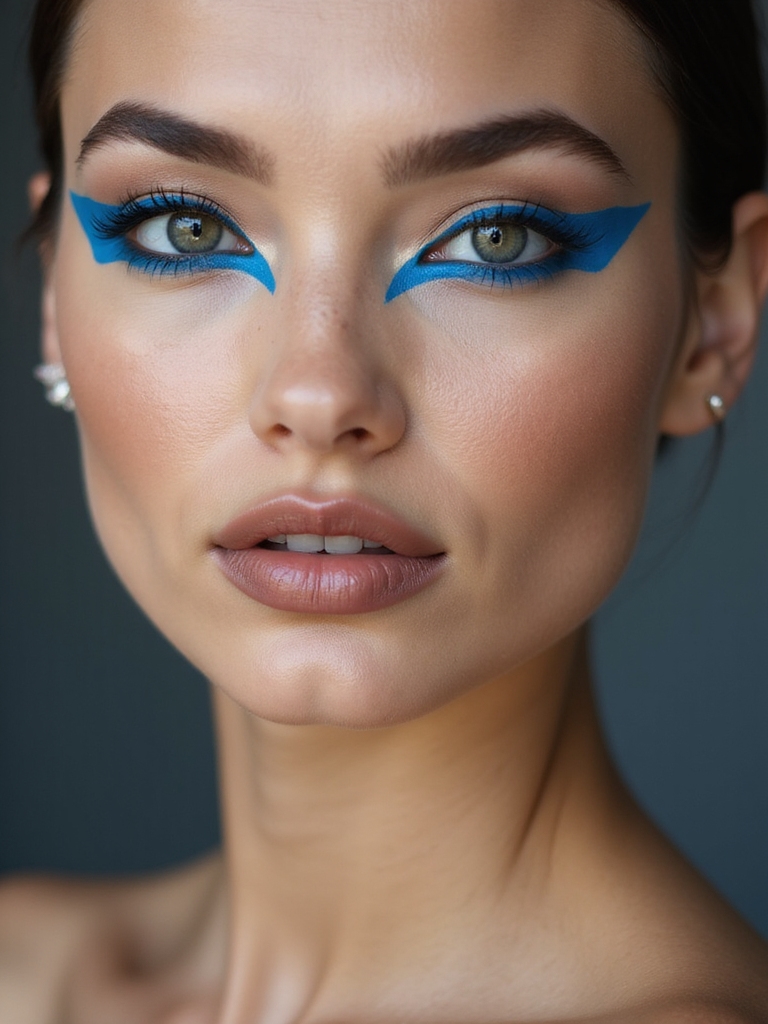
A floating cerulean liner draws a bright blue line above the crease, leaving the lid bare, for a graphic, fashion-forward effect. The single pop of creative liner gives instant edge without filling in the whole eye.
Floating Versus Classic Liner
It’s a modern, editorial way to wear blue that’s easier than a full cut crease, since you’re drawing one line rather than carving a shape. A fine brush and a steady hand are all you need.
Cerulean is bright and a little tropical, so it feels playful and bold. Keep the rest of the face minimal so the floating line stays the focus.
How much blue do you want?
🎯Subtle
A navy waterline or teal inner-corner pop: color you feel more than see.
🎯Bold
A cobalt wing or glossy royal lid: full, photo-ready blue.
Duochrome Blue-Green Halo

A duochrome halo eye shifts between blue and green as you move, with a pop of the shimmer in the center of the lid. It’s mesmerizing and a little futuristic, the most dimensional way to wear blue.
The duochrome pigment catches light differently from every angle, so the eye looks alive and multi-tonal. Placed in a halo, with deeper shade at the corners, it makes the eyes look bigger and brighter.
- Press a blue-green duochrome onto the center of the lid.
- Deepen the inner and outer corners to frame the halo.
- Keep the crease soft so the shimmer center pops.
Indigo Smudged Lower Line
Smudging indigo along just the lower lash line is a subtle, cool way to add blue without a full lid. The deep blue-purple smoked under the eye adds definition and a moody pop of color, unexpected and a little edgy.
It’s a low-commitment way to wear a darker blue, since the placement is small and easy to control. Pair it with a clean upper lash line and mascara for balance.
Smudge a creamy indigo pencil under the eye and soften it with a brush. On deep skin, indigo reads rich and striking against the complexion.
Icy Metallic Blue Spotlight

An icy metallic blue placed in the center of the lid creates a spotlight effect, reflecting light like chrome. It’s cool, futuristic, and high-shine, the look for someone who wants blue with serious wow factor.
Press the metallic on with a fingertip for the most reflective payoff, and keep the corners slightly deeper to make the center shine pop. The icy tone suits cool skin especially, though a slightly warmer metallic blue widens the range.
Glossy Royal-Blue Lids

A glossy royal-blue lid is editorial and bold, a wet-look wash of vivid blue topped with gloss for a high-shine, runway finish. It’s the most fashion-forward blue here, the kind that owns a photo.
Because gloss creases and moves, it’s a photo-and-event look rather than all-day wear. Apply it last and blink carefully while it sets, keeping the skin and lip simple.
Royal blue is rich and saturated. It flatters every skin tone, and especially striking against deep skin where the vivid blue glows. It’s bold, so let it be the whole story.
Denim-Blue Soft Blend
Denim blue is the most wearable everyday blue, a muted, slightly grayed-down blue that reads soft and neutral, like a favorite pair of jeans. Blended like a smoky eye, it gives color soft enough for daytime.
The muted tone is what makes it so foolproof, since it isn’t as bright or demanding as a true cobalt. It works as a soft smoky eye or a simple wash, flattering across skin tones.
Build it with a fluffy brush and blend the edges soft, treating it like a colored neutral. It’s the gateway blue for anyone easing in from browns and taupes.
Navy-to-Sky Gradient Wing
A gradient wing fades a deep navy at the outer corner into a bright sky blue toward the inner eye, so the liner shifts color across the lash line. It’s a graphic, eye-catching twist on a wing that shows off two blues at once.
- Line navy at the outer corner and sky blue toward the inner.
- Blend where the two meet so the gradient looks smooth.
- Keep the line clean so the color shift looks intentional.
Ultramarine Floating Crease

A deep ultramarine drawn as a floating crease line gives rich, saturated blue with a graphic edge. Bolder and deeper than cerulean, it traces an arc above the crease for a dramatic, modern definition that lifts the eye.
Smoking the Arc
It’s a fashion-forward look that’s more forgiving than a full cut crease, since you draw a single arc rather than carving a whole shape. Smudge it slightly for a smokier version.
Ultramarine is intense and jewel-like, so it makes a real statement. Keep the lid and the rest of the face clean so the deep blue arc carries the look.
How to Ask Your Stylist
Most blue looks are doable at home, but for a big event a makeup artist is worth it, and the right words help. Ask for the specific look by name, a ‘cobalt graphic wing’ or a ‘smoked sapphire eye’, and bring a photo, since ‘blue eye makeup’ is too broad. Tell them whether you want subtle, like a navy waterline, or bold, like a glossy royal lid. A professional eye look runs about $40 to $80 on its own.
If you’re doing it yourself, invest in pigment quality, since cheap blue shadows go patchy and chalky fast. A creamy navy pencil, one vivid cobalt liner, and a single good blue shadow cover most of this. I tell every client to do their eyes before their base when working with blue, because bright shadow sheds fallout that’s easy to wipe away before foundation goes on.
Blue Eye Makeup Questions
?Does blue eye makeup suit brown eyes?
Brown eyes are blue’s best match. The contrast makes brown look warmer and more lit-from-within, so a cobalt wing or sapphire smoky eye makes brown eyes truly pop. Blue flatters every eye color, but the effect on brown is the most striking.
?How do I wear blue without it looking dated?
Keep it modern with finish and placement. Skip frosty eighties shadow for matte, glossy, or metallic blues, use a light hand, and keep the rest of the face clean. A thin cobalt line or a smoked sapphire reads chic and current, never retro.
?What blue suits deep skin tones?
Rich, saturated blues shine on deep skin: cobalt, royal, sapphire, and teal all glow against the complexion. Pigmented over pale, frosty shades, which can look ashy. A bright blue against deep skin is one of the most striking eye looks there is.
?What’s the easiest blue look for beginners?
A navy waterline or a teal inner-corner pop. Both add a hint of blue with zero skill required, and they read as bright, defined eyes rather than obvious color. Build up to a cobalt wing or smoky sapphire once you’re comfortable.
?How do I stop blue shadow from looking patchy?
Use quality pigment and a primer. Cheap blue shadow goes chalky, so invest in one good blue, and a sticky base or eye primer makes the color apply smooth and saturated. Pressing color on with a fingertip rather than sweeping also boosts payoff.
Make Blue Your Statement
Blue has earned its comeback because it does something no neutral can: it makes every eye color pop and photographs like a dream. From a barely-there navy waterline to a glossy royal lid, the modern way to wear it is all about finish and a light hand, which keeps it chic instead of stuck in the past.
So which blue feels like you, the subtle navy or the electric cobalt? Pick one, keep the rest of your face clean, and let blue be the unexpected color that makes your eyes the whole story.


