
I’m chasing sparkle from every angle, and you’re coming with me. Picture chrome-dipped tips, a sheer glaze that catches light like mist, and a galaxy ombre that looks stolen from midnight streets.
I sketch micro-glitter French curves, leave airy negative-space crescents, then switch to marble swirls in jewel tones. Matte meets gloss, confetti drips, and cat-eye bands flicker like neon. Want the secret to sealing that shine so it lasts through late nights and clinking glasses?
Chrome-Dipped Glitter Tips

Under the salon lights, I watched a simple glitter tip turn magic with a chrome kiss. I held my breath as the tech flashed a mirror sheen over twinkling edges, and boom—mini galaxies.
You’d love the flip: soft sparkle in the shade, molten metal when I move. I picked rose chrome over silver specks; you might try lilac with holo. Instant party, zero drama. I also love pairing chrome with delicate metallic accents for added dimension and shine delicate metallic accents.
Sheer Sparkle Glaze Manicure

Whisper: that’s what my nails do when I brush on a sheer sparkle glaze and let the light catch.
I love how it softens everything—like gloss on a love note.
One thin veil, then another, and suddenly my hands look lit from within.
You can wear it alone or over any color.
It’s effortless, flirty, and camera-ready without trying.
Blink, shimmer, smile.
Glossy finishes create a wet-look shine that enhances dimension and depth.
Galaxy Ombre With Holographic Flecks
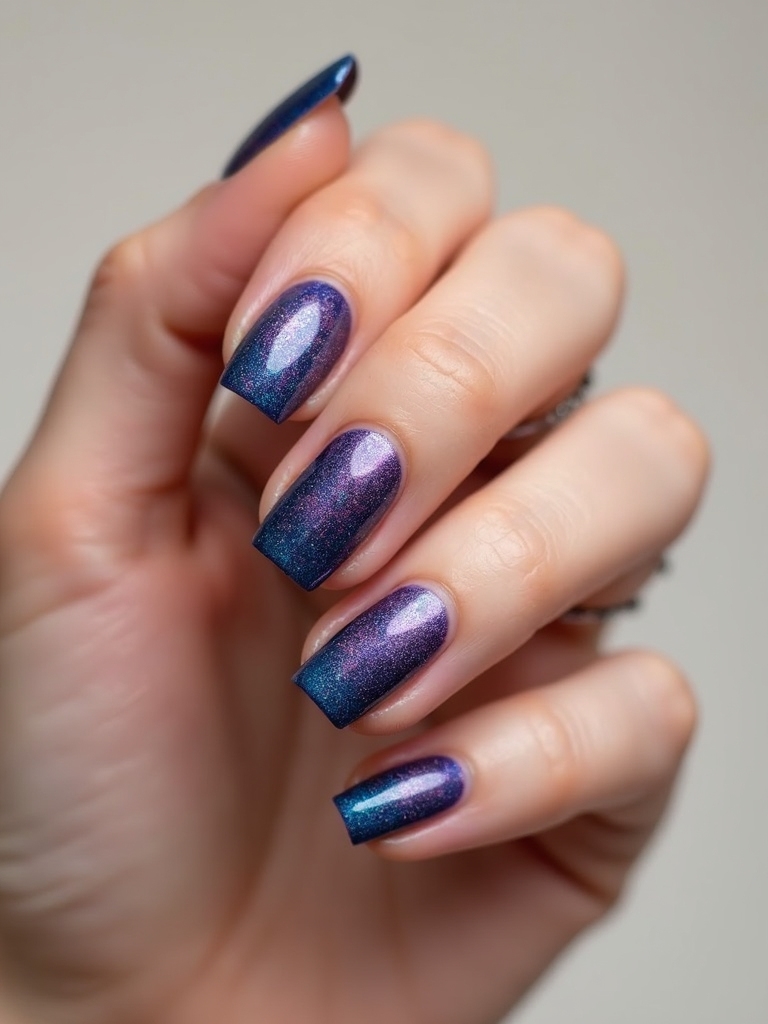
Even before the top coat dries, I’m chasing starlight across my fingertips—blending midnight indigo into violet, then fading to nebula pink at the cuticles like a slow-blooming aurora.
I tap holographic flecks over the ombre, and suddenly tiny comets streak when I wiggle my hand. You’ll see constellations appear under café lights. I seal everything, breathe, and whisper: orbit secured, shimmer engaged, launch sequence complete.
The result feels like a miniature ombre nail masterpiece on each nail.
Negative Space Glitter Cuticles

I was painting my nails when a sparkly idea whispered, “Let’s keep it minimal,” so I kissed the cuticles with tiny glitter accents and left the center clean.
You’ll love how the strategic negative spacing makes your nail beds look longer while the shimmer hugs the edges like a chic halo.
With a long-wear top coat, that cuticle sparkle hangs on for days, catching light every time you wave hello.
Negative space designs often use bare areas to create striking contrasts, like negative space nail designs that frame the glittered cuticles.
Minimalist Sparkle Accents
Sometimes the tiniest shimmer tells the whole story, so I trace a whisper-thin crescent of glitter along the cuticle and let the rest breathe. You catch it when I wave, a quiet wink of light.
I choose a micro-fleck polish, tap off excess, and seal with glossy topcoat. The effect? Crisp, clean, and coy. It’s my favorite secret—minimal sparkle that still turns heads. I sometimes pair it with barely there neutral shades to keep the overall look understated and elegant.
Strategic Negative Spacing
While the urge to flood every nail with sparkle is real, I leave deliberate gaps—crisp crescents at the cuticle—so the glitter frames, not smothers.
I learned this trick during a rainy-day manicure, when restraint suddenly looked chic. You’ll see what I mean:
1) Map the crescent with a fine brush.
2) Pack glitter along the curve.
3) Seal, then admire the airy, spotlighted glow.
This subtle approach draws on the same principles as Subtle Gradient techniques to keep the look refined and wearable.
Long-Wear Cuticle Shimmer
From the very edge of the cuticle, I let a whisper of shimmer do the talking—like a halo that never chips.
You’ll see it: a sleek crescent of negative space, rimmed in micro-glitter, catching light whenever you wave.
I prep with dehydrator, seal with a flexible topcoat, and cap edges.
The result? Weeks of twinkle, minimal grow-out, maximum compliments.
Your hands do the sparkle.
I also recommend regular cuticle care to keep the look healthy and long-lasting.
Micro-Glitter French With Sculpted Arches

I set my brush at a jaunty angle and sculpt the crispest little arches, like framing a smile on each nail.
Then I sprinkle micro-glitter with surgeon-level aim—just enough sparkle hugging the curve without crowding the tip.
Seal it smartly, and you’ll wear this French like a marathoner: glossy, chip-shy, and still flirty at the finish line.
This 3D approach borrows techniques from 3D Nail Art to add dimension and lasting hold.
Precision Arch Sculpting
Although the name sounds ultra technical, Precision Arch Sculpting is my playful twist on a micro‑glitter French: I sculpt crisp, lifted arches that frame the nail bed like couture brows for your fingertips.
I map your natural curve, then coax it higher—sleek, balanced, and bright. Think meet‑cute between elegance and sparkle.
1) I sketch the arch.
2) I refine symmetry.
3) I seal brilliance.
Micro-Glitter Placement Tips
Before the glitter even winks, I choreograph each speck to hug the sculpted arch—tight at the apex, looser toward the corners—so the sparkle reads like a polished whisper, not confetti chaos.
I tap micro-glitter with a fine liner, breathing steady, nudging grains like stars into orbit. You’ll see the curve bloom. I pause, check symmetry, then refine edges, letting negative space amplify the twinkle.
Long-Wear French Finish
While the gel warms under the lamp, I map a crisp smile line and lock it in with a whisper-thin veil of micro-glitter, densest at the apex to echo the sculpted arch.
You want a French that lasts and sparkles? I follow three beats:
- Prime meticulously; dehydrate and base.
- Sculpt arches; cap edges tight.
- Seal twice; flash-cure between.
Then, I admire mirror-clean, long-wear twinkle.
Confetti Pop Accent Nails

Cue the confetti—let’s deck out a single nail (or two) with a sparkling pop that steals the show. I pick one fingertip as the party host, then scatter multicolored glitter like confetti at midnight. You get contrast, I get compliments.
I anchor it with a sheer base, dab chunky pieces, add micro sparkle, then seal. Suddenly, every gesture feels like a celebration.
Velvet Glitter Cat-Eye Effect
Sweep a magnet over shimmering gel and—bam—the polish pulls into a velvety band that looks like moonlight trapped in satin. I hold my breath, tilt the light, and the stripe slinks like a cat. You’ll grin when it purrs across your nails.
1) Pick a deep base; cure.
2) Float magnetic gel; hover magnet.
3) Lock the effect; top coat.
Chunky Glitter Drip Edges

I still remember the first time I tried chunky glitter drip edges—I picked jumbo flakes that sparkled like candy and you gasped.
I’ll show you how to sketch the drips so they look juicy and intentional, not messy.
Then we’ll lock it all in with a glossy seal so your sparkle lasts through every text and latte.
Choosing Glitter Size
Ever wonder why some glitter drips look luxe while others feel messy? I learned fast: glitter size decides drama. For chunky drip edges, I mix sizes like a DJ layering beats, keeping balance and sparkle.
1) Micro glitter fills gaps, adds seamless shine.
2) Medium pieces bridge texture, prevent bald spots.
3) Large hexes deliver bold pops—use sparingly.
I test on a swatch, then commit confidently.
Perfecting Drip Shape
Trace the drip like melted candy, then let gravity help me fake it. I load my brush with chunky glitter, touch the edge, and watch it slide into a delicious droplet.
I pause, tilt, and nudge—short drips near the cuticle, longer ones toward the tip. I outline curves with a fine liner, add a few sparkle clusters, then connect them like sugary stalactites. Nailed it.
Seal for Longevity
Skirting the edges of those sugary drips, I lock everything in so the glitter won’t snag or shed. I seal like a secret keeper—quick, bright, and tidy—so your chunky sparkle survives clinks and selfies.
1) I float a thin gel layer over edges, capping tips.
2) I flash-cure, then add a second, smoothing coat.
3) I finish with alcohol wipe—crisp, glassy, unstoppable.
Molten Metal Foil and Glitter Mix
While the polish is still whisper-warm, I press crinkled metallic foil into the surface and sprinkle micro-glitter like stardust, watching the finish ripple into a molten metal dream.
You’ll hear the tiniest crackle as the foil kisses lacquer. I seal edges with a gentle tap, then flash-cure. When I tilt my hand, rivers of chrome and twinkling sparks collide, and you’ll whisper, “Pour me that.”
Pastel Gradient With Iridescent Dust
Let’s drift from dawn to daydream as I sponge on a soft gradient—mint melting into lilac, then a hush of peach at the tips. I dust on iridescence, and the colors sigh into each other like cotton candy skies.
You’ll see it catch every wink of light as we move.
- Prep, buff, and base.
- Sponge gradient gently.
- Tap shimmering dust.
Crystal-Capped Glitter Moons

Moonlight meets sparkle as I paint slim, gleaming crescents at each cuticle, then crown them with petite crystals that twinkle like secrets.
You tilt your hand, and the moons wink back—soft glitter arcs, crisp edges, little gems catching every whisper of light.
I anchor each crystal with clear gel, then seal the curve, so wear stays graceful.
Tonight, your manicure speaks fluent stardust.
Matte-Gloss Contrast With Sparkle Stripes

Between velvet hush and mirror shine, I lay down a matte base, then slice in glossy bands that feel like secret lanes at midnight. I tip each stripe with fine glitter, like headlights winking.
- I map thin routes with striping tape, then gloss and peel.
- I dust micro-sparkle only on the lanes’ edges.
- I seal everything, preserving hush, flash, and that playful after-dark hum.
Jewel-Tone Glitter Marble Nails

Gemstones tumble across my fingertips as I swirl emerald, sapphire, and amethyst into a glitter-kissed marble that feels like treasure found in a tide pool.
I puddle jewel polishes, drag a thin brush, and let veins of sparkle thread like constellations.
You’ll watch them shift in light—moody, regal, alive.
Seal with glossy topcoat, and we’ll toast to portable opulence with every shimmering gesture.


